
The Shell at Rest — One Month Later
This is Part 4 of the Auburn Vanishing Edge Pool series. Series Overview | Part 1 — Design | Part 2 — Engineering | Part 3 — Construction | Part 5 — Completion
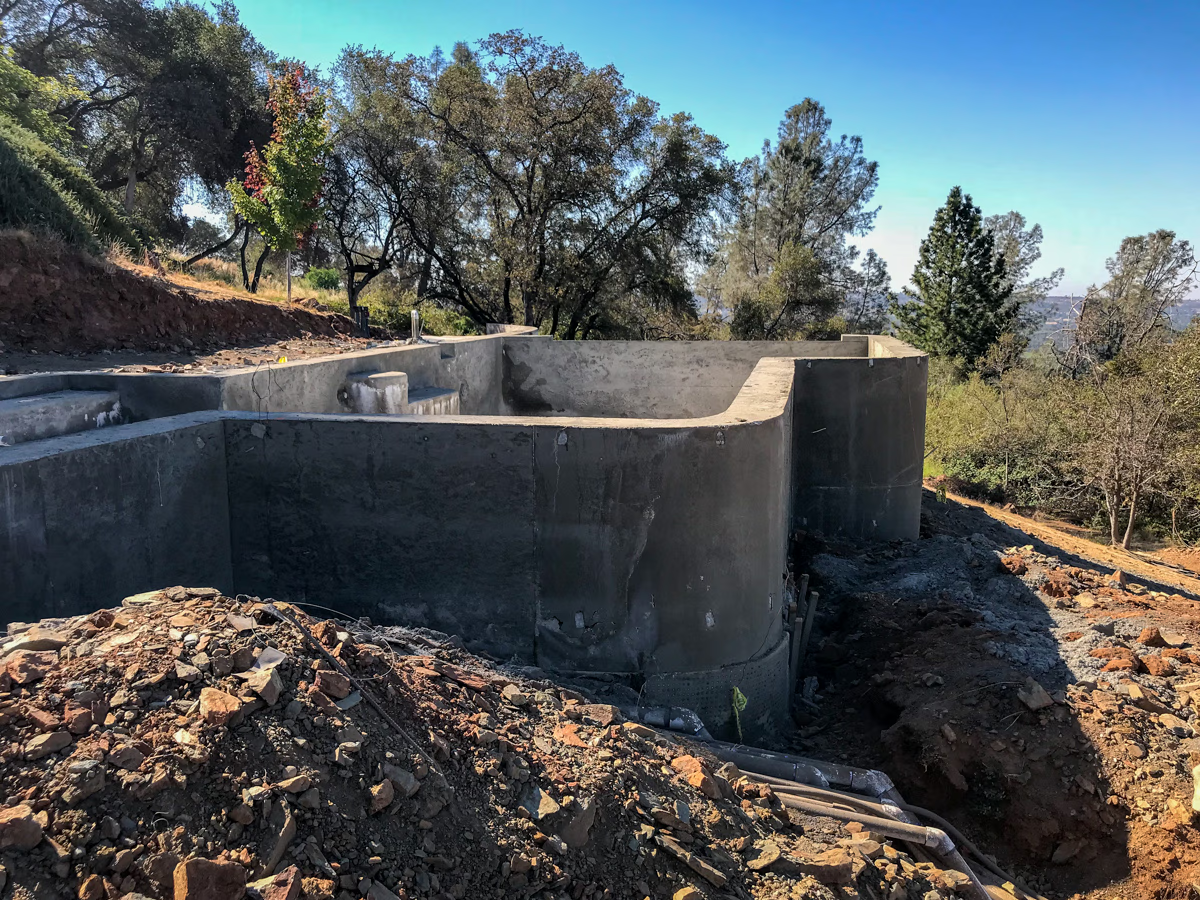
After the gunite was completed, the homeowner water-cured the shell for two weeks. After an additional two weeks of curing, the forms were stripped and removed.
It was a remarkable moment to finally stand back and see the structure clearly for the first time — no forms, no bracing, just the finished gunite shell rising out of the hillside. You see it on paper during the design phase, but to actually stand there and see it taking shape against the Sacramento Valley is something else entirely. At that point we were still just getting started. There was a lot more work ahead.
Waterproofing the Freestanding Structure
This pool wasn’t a typical backyard installation. The vanishing edge wall, catch basin, and surrounding structure sit well above grade on an exposed Auburn hillside — visible from the outside, subject to weather, and carrying water under continuous operating pressure. That changes the calculus on waterproofing.
My thinking was straightforward: water belongs inside the vessel, not inside the structure. Gunite is a strong and durable material, but it is porous. On a standard in-ground pool the surrounding soil provides some buffer against moisture migration. On an elevated freestanding structure, there is no such buffer. Any moisture that works its way through the shell has nowhere to go except down the face of the exposed wall — and over time, that means staining and efflorescence on surfaces that will always be visible.
Before tile work began, the interior and exterior surfaces of the freestanding structural elements — the vanishing edge wall, catch pool walls, and other exposed elevated portions of the shell — were treated with a cementitious waterproofing membrane to reduce moisture migration through the structure wherever it could eventually become visible. It is not a detail most homeowners will ever see or think about. But it is the kind of decision that determines whether a pool still looks right twenty years from now.
Floating the Bond Beam — Working Through the Smoke
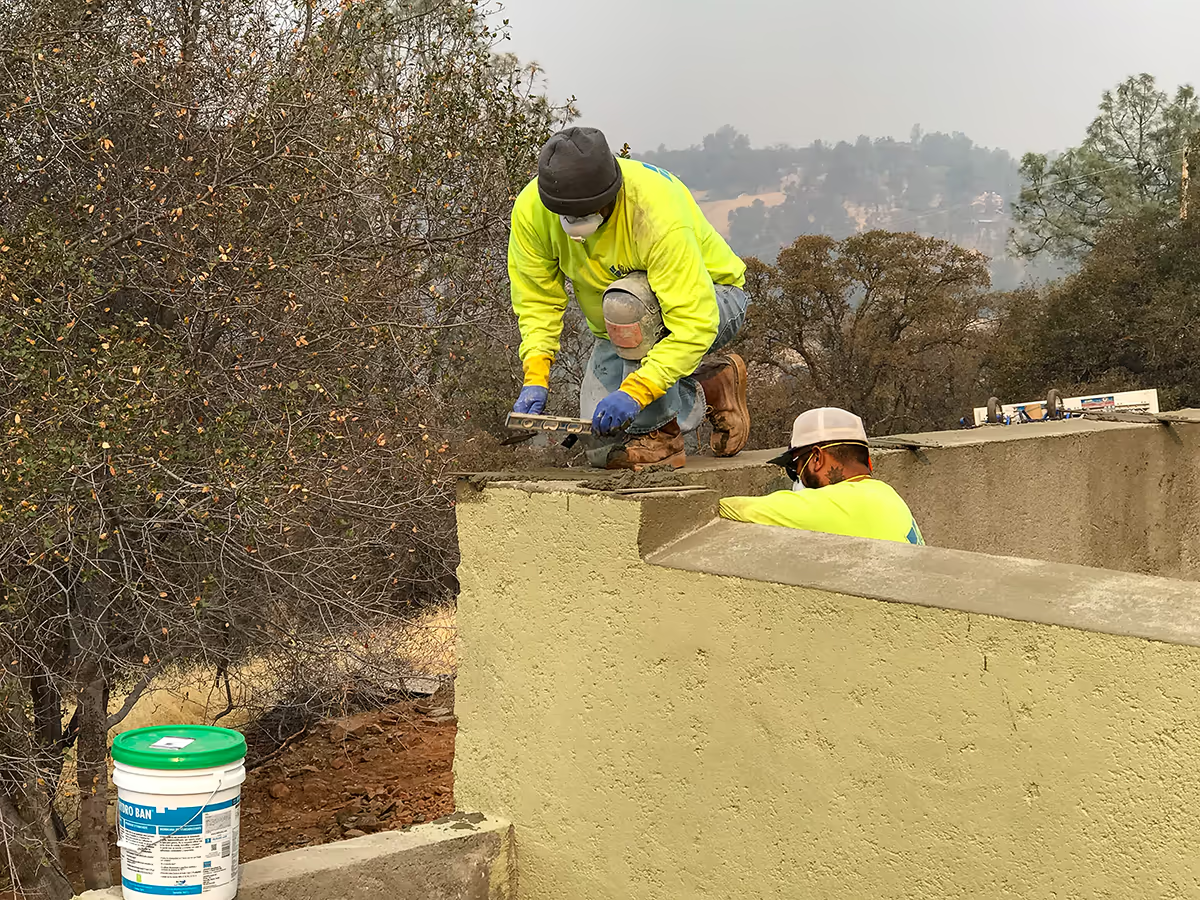
We had the tile crew scheduled, and when the day came there was an active wildfire burning nearby. The smoke was heavy enough that everyone on site was wearing N95 respirator masks — the crew, and me. We made the decision to push through and get the work done.
The first step for the tile crew was establishing a perfectly level bond beam. One crew member set wood screed boards on the vanishing edge wall top, using a torpedo level to establish the precise elevation for the float coat. Working through smoke is never ideal, but the crew didn’t miss a beat.
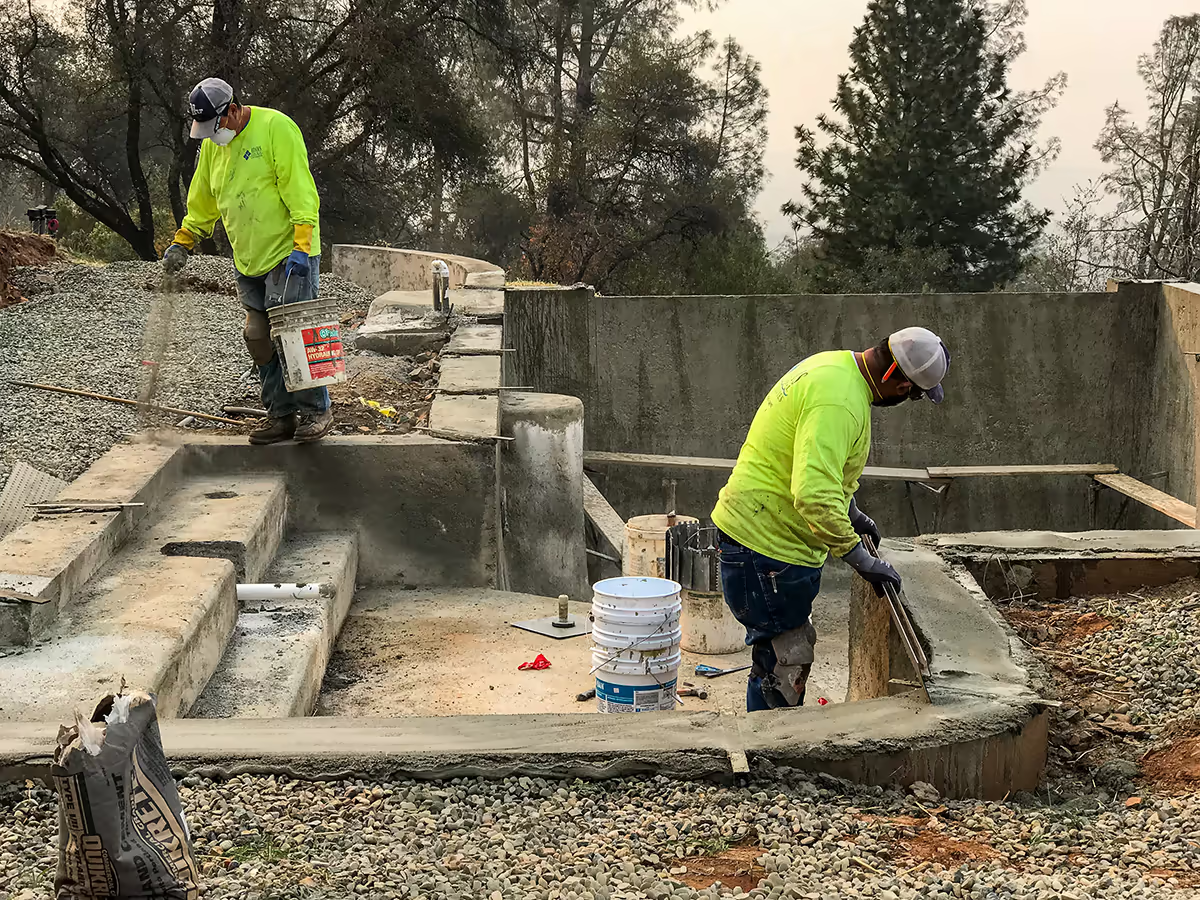
With the screed boards set, the crew moved to the pool interior. One worker sprinkled dry cement onto the gunite bond beam to promote adhesion between the gunite surface and the float mud. A second worker rodded off the float mud between the level screed boards, bringing the entire bond beam surface to a flat, consistent plane.
This is the step that determines whether the finished tile line will be perfectly level around the entire perimeter of the pool. The float mud establishes the finished bond beam elevation and the reference for the top of the waterline tile. If the screed is off, the tile line will be off. There is no easy way to correct it later.
After allowing the float coat to cure, the tile crew installed 6-inch by 6-inch dark slate waterline tile around the interior perimeter of the pool and wading pool using premium swimming pool thin-set mortar. I have always preferred 6-by-6 tile for swimming pools because it minimizes the number of grout joints. Fewer grout joints generally means fewer maintenance issues over the life of the pool.
It never fails — once the tile is installed and you can see the level bond beam line running around the pool, the entire project changes. The pool begins to look like a pool. A little color goes a long way.
The Vanishing Edge Wall — Tile, Waterline, and Function
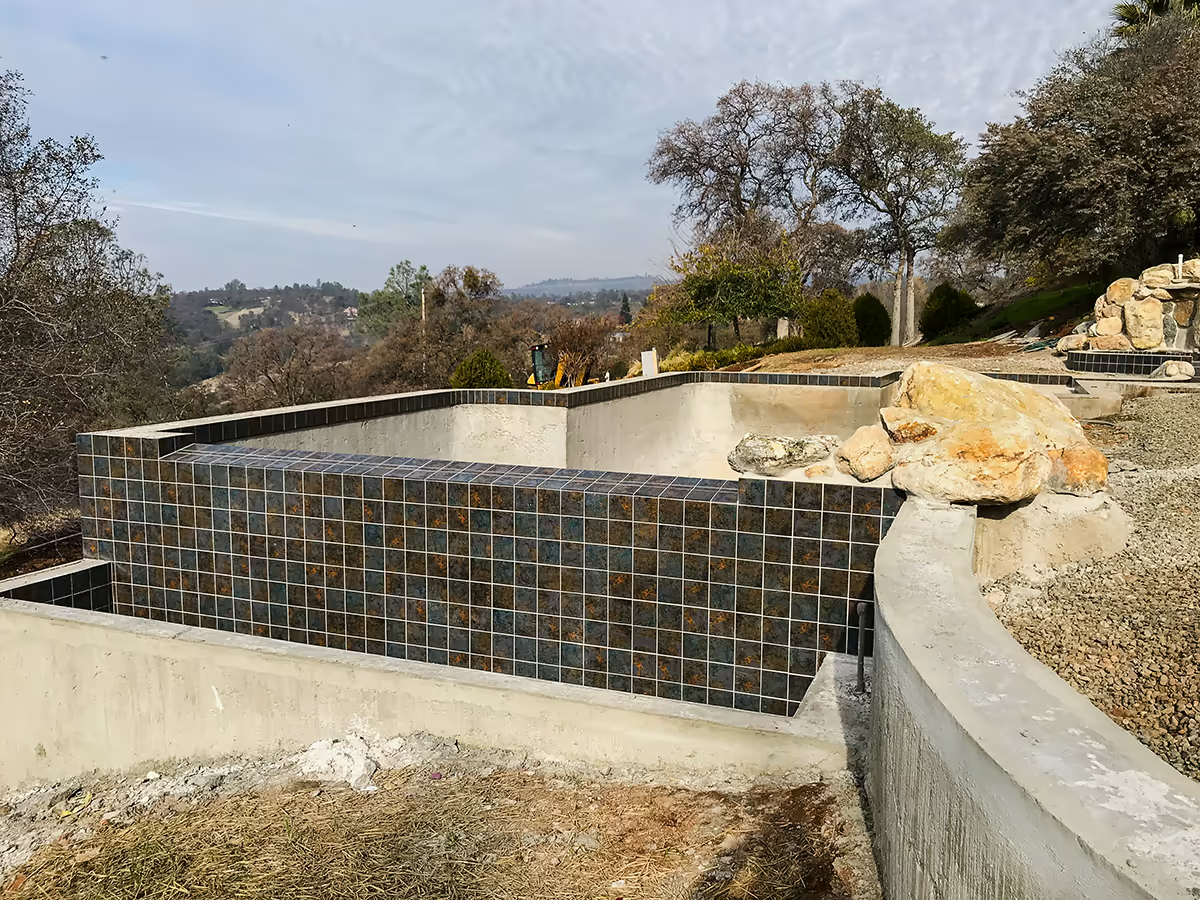
The vanishing edge wall received special attention. The crew finished the face of the vanishing edge wall with 36 inches of dark slate tile. The tile meets the top of the catch pool bond beam and continues approximately 18 inches below it into the catch pool. I like to carry three additional rows of tile down into the catch pool from the top of the catch pool bond beam. The catch pool water level is constantly changing during operation, and it simply looks better when the fluctuating waterline remains against tile rather than against the interior finish. The tile weir shelf was set with a deliberate slope toward the catch pool.
That slope is functional. When the variable speed pump runs at high speed, water breaks over the edge dynamically — more sound, more visual excitement. At lower pump speeds the water sheets quietly over the tile face. The homeowner gets two distinctly different vanishing-edge experiences from the same feature at the push of a button.
The Wading Pool and Waterfall — Designed and Built in the Field
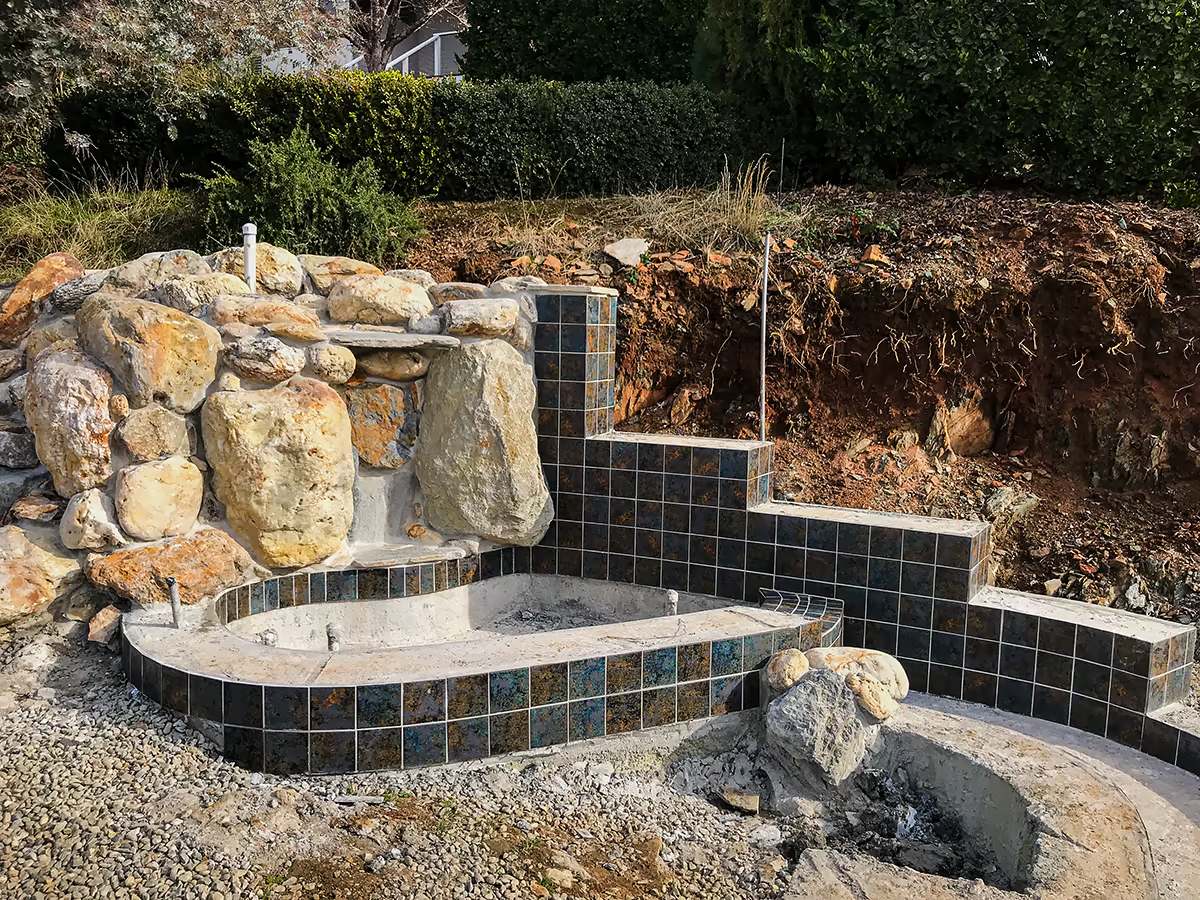
Of everything that went into this project, the wading pool and waterfall may best represent what custom pool building actually is at its core.
These features were a last-minute addition requested by the homeowner. There were no detailed engineered drawings, no dimensioned plans showing boulder locations, no specifications dictating the exact shape of the seat or the precise height of the falls. I laid out the forms by hand on site, shaped the structures freehand, and made adjustments as the work evolved. I built the wading pool and waterfall the same way I’ve built many custom features over the years — by laying things out, stepping back, looking at them, and making adjustments until everything felt right.
The homeowner had two specific requests. He wanted a shallow wading pool where he could introduce his new baby and young children to the water and help teach them to swim. And he wanted a seat beneath the waterfall — a place where he could sit, relax, and feel the water cascading over and around him. Those two requests defined the entire feature. Everything else grew from them.
I designed and built a reinforced gunite waterfall pad that supports the Sierra boulder structure above while creating a seat beneath the waterfall. The wading pool was shaped with a shallow, gently curved floor that would be comfortable for small children and practical for a parent sitting in the water with them. The seat beneath the falls was positioned so the homeowner could sit at water level with the falls dropping directly overhead — not beside the falls, not near them, but underneath them.
A Deliberate Blend of Natural and Contemporary
Since the pool itself had a clean, contemporary character, I wanted the waterfall to belong to the same design language rather than feel like a separate rustic feature dropped into a modern setting. The solution was to combine natural Sierra boulders with a stepped tile wall — the same dark slate tile used on the pool bond beam — rising behind and beside the waterfall structure.
The natural stone provides texture, weight, and organic character. The stepped tile wall introduces the geometric lines and clean horizontal planes that tie the waterfall visually back to the vanishing edge pool. Neither element overwhelms the other. The result is a waterfall that reads as natural from a distance but reveals its contemporary geometry up close — a hybrid that fits the hillside setting and the pool equally well.
The Spillway Channel
The wading pool does not stand alone as a separate feature. A spillway channel leads from the wading pool directly into the main pool, connecting the two hydraulically. Water fills the wading pool, overflows into the channel, and flows into the main pool as part of the same recirculating system. The waterfall, the wading pool, the spillway channel, and the main pool all work together as one integrated water feature.
Setting the Sierra Boulder Waterfall — Art as Much as Construction
Before any boulders were placed, the gunite waterfall pad was sealed with a cementitious waterproofing sealer — the same logic applied to the freestanding structure. A wet structure holding a continuous waterfall needs to be as watertight as the pool itself.
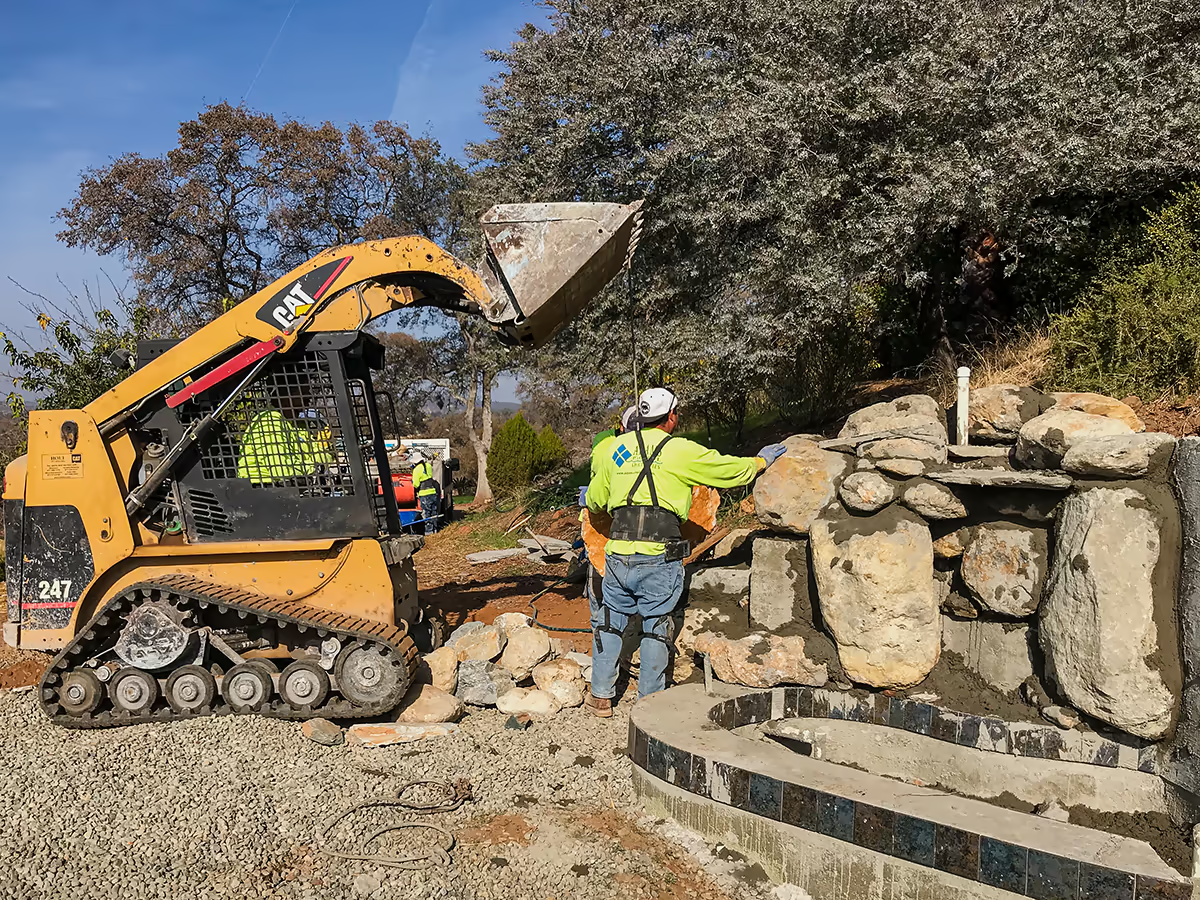
With the tile set and cured, the rock crew arrived with a selection of Sierra boulders and a CAT 247 skid steer. The sequencing mattered: the tile had to be firm before any heavy boulder work started. You do not place and adjust thousand-pound stones above fresh tile.
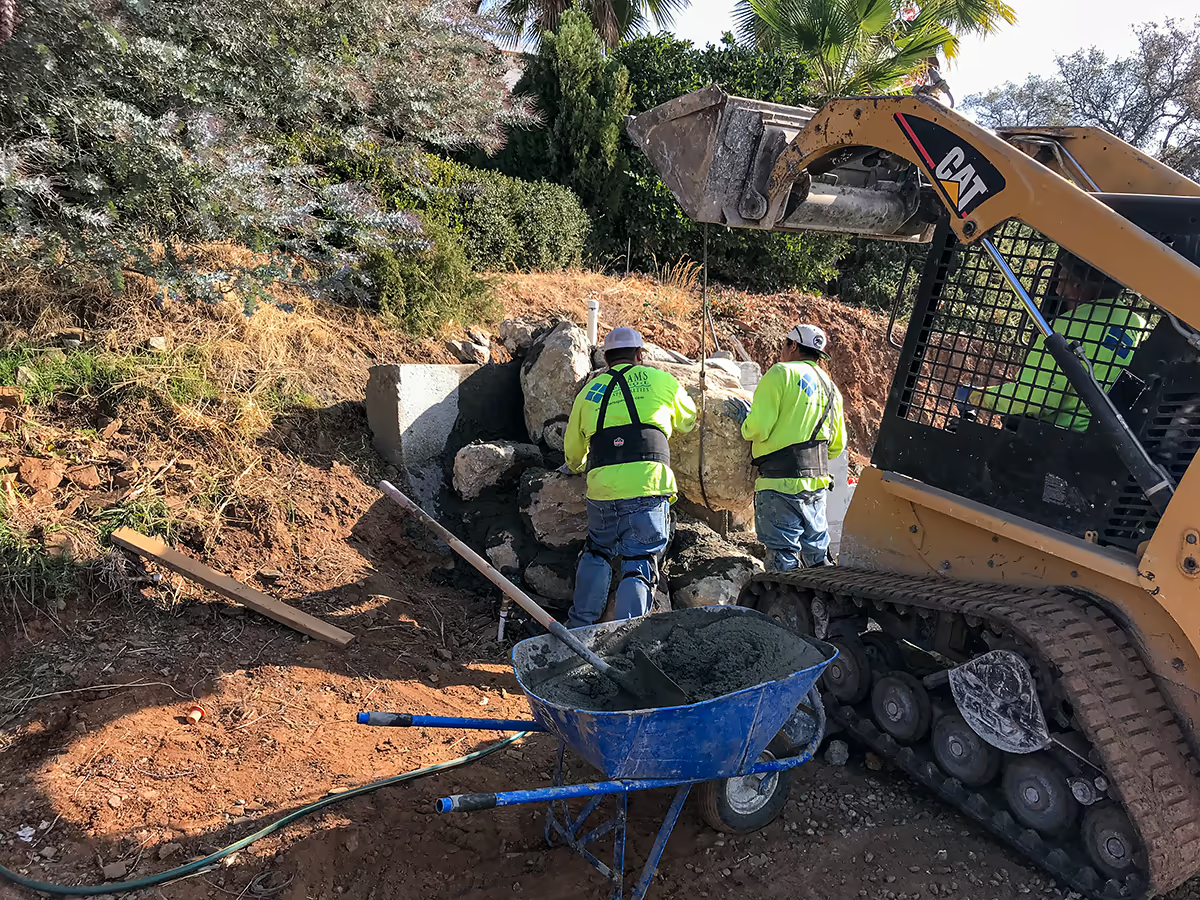
The boulders were set by skid steer and mortared in place for a watertight assembly. A steel cable rigged to each boulder allowed the skid steer to maintain controlled tension while the crew fine-tuned position — essential when working with stones in the one-thousand to several-thousand pound range. Once position was confirmed from every angle, the crew mortared the joints thoroughly. Every boulder in the waterfall structure is set permanently and watertight.
What the photographs do not fully show is how the waterfall came together as a process of collaborative judgment rather than plan execution. When the rock crew arrived, I explained the concept and walked them through what I was trying to achieve. We looked at the available boulders, discussed how each stone’s shape and character could contribute to the overall composition, and began placing them one at a time.
At one point during the process, the crew members actually sat down beneath the proposed waterfall opening — physically positioned themselves where the homeowner would eventually sit — to evaluate whether the seat would be comfortable, whether the falls opening above felt right, whether the scale of the boulders framing the seat was proportional. We moved rocks, stepped back, sat under the falls again, and kept refining until the feature felt the way it was supposed to feel.
Some parts of a project can be drawn on plans. Building a waterfall is not one of them. It takes experience, patience, and a willingness to keep adjusting things until they look right. The rock crew brought all of that, and the result speaks for itself.
The Jump Rock

The homeowner was very clear about one thing — he wanted a big jump rock. Finding the right boulder was only part of the challenge. A stone weighing several thousand pounds places a significant load on the structure beneath it, so the support had to be built with that weight in mind from the very beginning. Before any rock was selected, I incorporated additional reinforcing steel and increased the gunite thickness in the jump rock support area. The reinforced gunite pad beneath the boulder is approximately 12 inches thick in the primary load-bearing zones, providing a stable platform designed to carry the weight of the stone and minimize the potential for settlement over time.
With the structure in place, I worked with the rock supplier to locate one of the largest Sierra boulders we could safely transport and install on the project. The result is a jump rock approximately five feet long and weighing about 5,000 pounds — large enough to create a dramatic feature, yet supported by a structure specifically built to carry the load.
Setting it required a four-man crew and the skid steer. Three crew members worked on the ground guiding and positioning the boulder while the fourth operated the machine. The rock was carefully maneuvered into place above the waterfall structure and rotated until it looked natural from every angle.
Natural stone is never perfect, and there are no detailed plans showing exactly where a boulder should go. You move it, step back and look at it, make adjustments, and keep working until it feels right. Once the jump rock was finally set, it became one of the signature features of the project — exactly the bold statement the homeowner was hoping for. From the pool deck it creates a dramatic focal point overlooking the Sacramento Valley and surrounding foothills. From the pool, it offers a unique place to sit, take in the view, and jump into the water.
A View That Never Gets Old
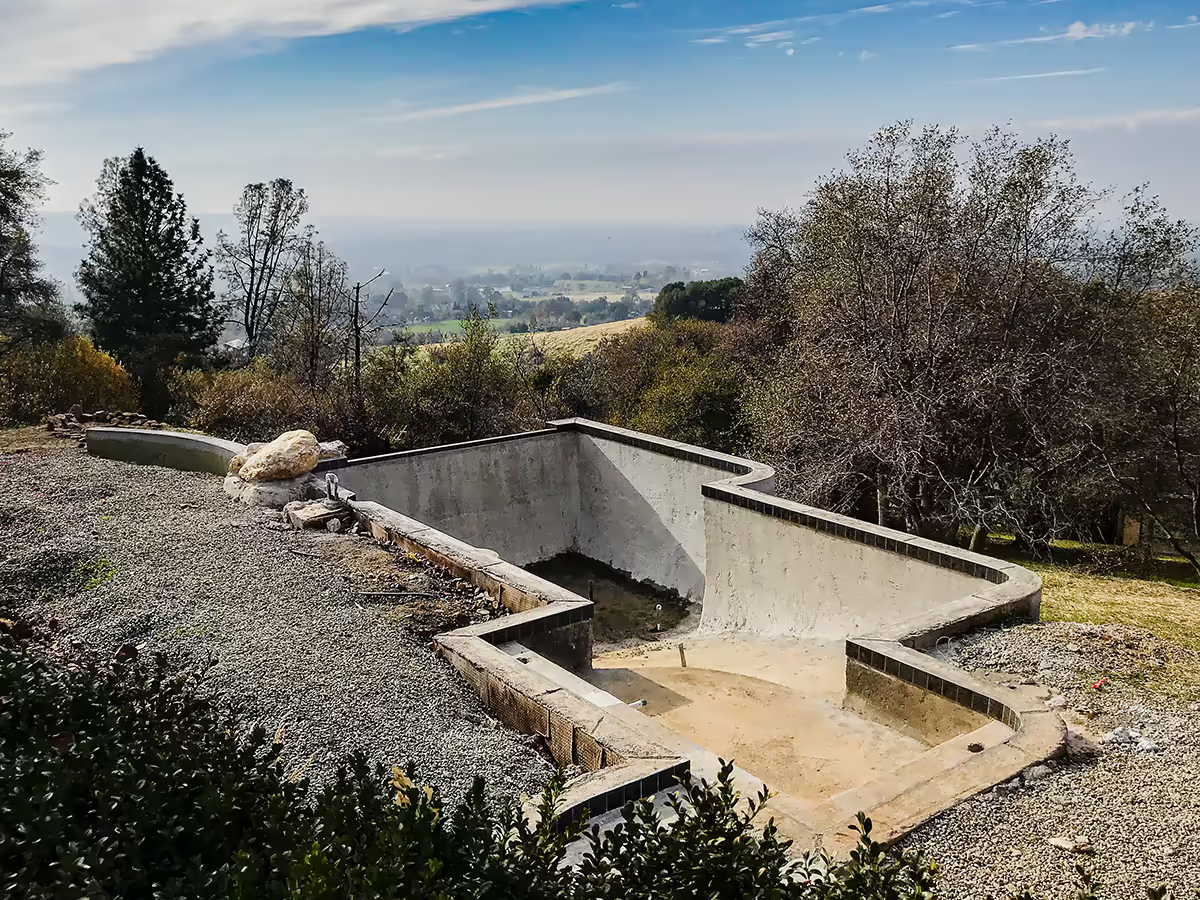
This is the spot where you can take in both the pool and the valley at the same time. I had stood in this same location during excavation with batter boards, during steel, during gunite day, and again as the tile went in. Each time the view was the same valley, but the construction in the foreground told a different story.
Standing here at this stage — tile set, jump rock in place, waterfall structure complete — was the first time the finished pool was truly easy to visualize. The Sacramento Valley has been the backdrop for this entire project from the first day of excavation. At this point it was starting to look the way it was always supposed to look.
The Wading Pool, Waterfall, and Retaining Wall
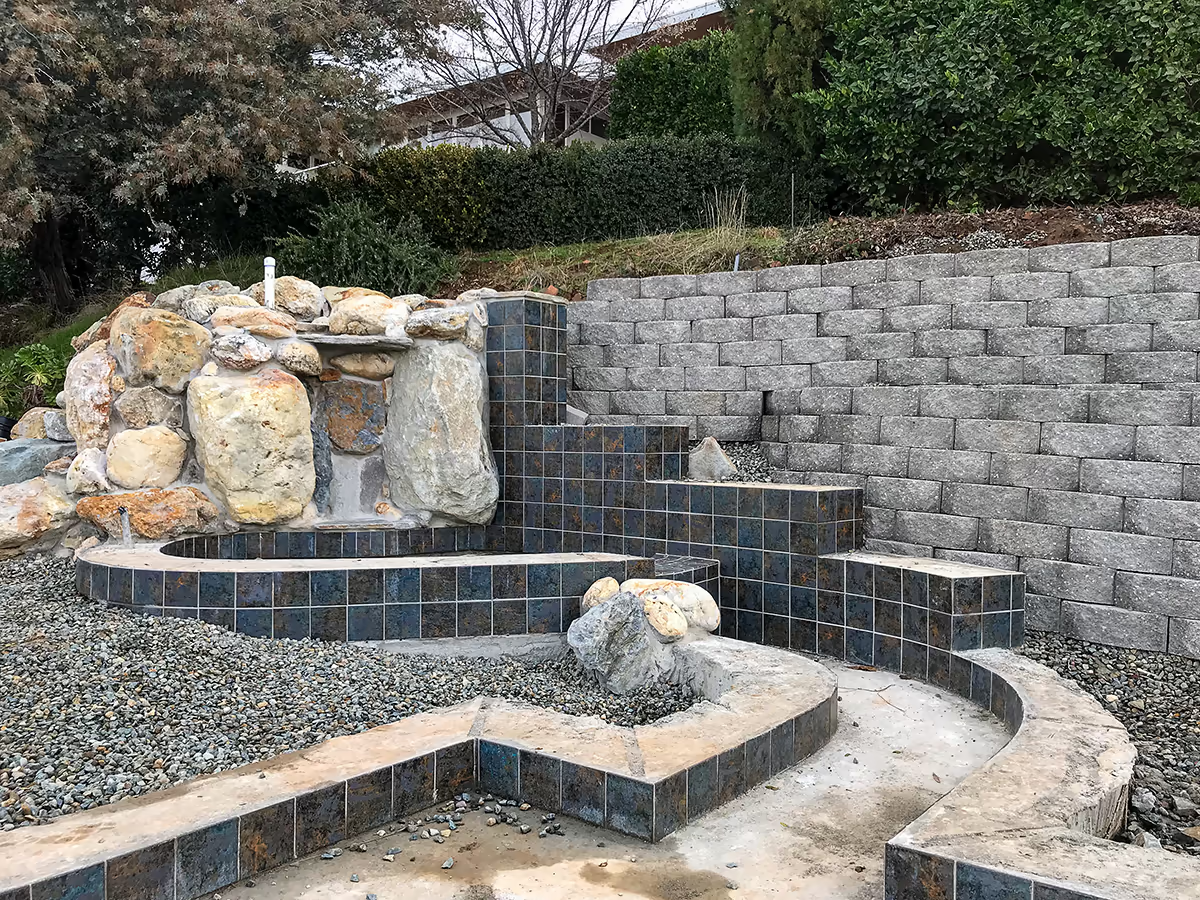
With the waterfall, jump rock, and wading pool complete, the full feature set was readable for the first time. The Sierra boulder waterfall rises from the back of the tiled wading pool. The spillway channel leads from the wading pool to the main pool. The stepped tile wall descends in a deliberate stair pattern — a clean geometric transition that echoes the contemporary lines of the vanishing edge wall on the opposite end of the pool — and meets the stacked keystone retaining wall that holds the hillside cut behind the entire feature.
The keystone retaining wall was a significant piece of work in its own right. The hillside behind the pool required a substantial retaining structure to establish the level pad that the deck would eventually occupy.
For the first time, I could step back and evaluate the entire feature as a finished composition. The seat beneath the waterfall, the scale of the falls opening, and the relationship between the various elements all came together the way I had envisioned during construction.
The Level Pad — A New Outdoor Living Area
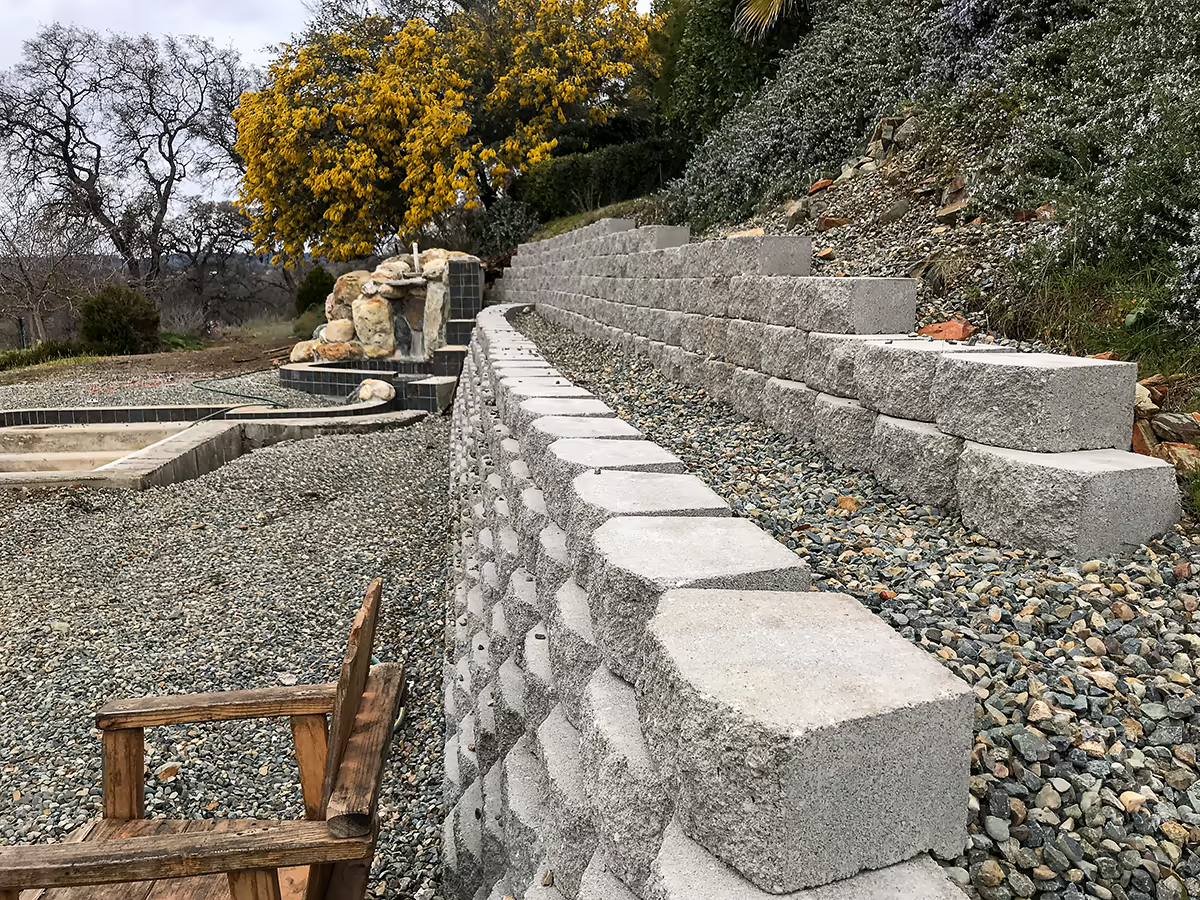
After the rockwork was completed, the site was graded with crushed gravel fill and prepared for the next phase of construction. The gravel established the final grades around the pool and provided a stable, walkable surface for the first time.
The owners couldn’t wait. They brought their outdoor lounge chairs out onto the freshly graded gravel and sat down to enjoy the view — the first time they had ever been able to simply sit in this part of their property. What had been a sloped, unusable hillside was now a level outdoor living area overlooking the Sacramento Valley.
Before the concrete decking went down, I asked them to spend time in the space. Walk around. Sit in different spots. Get a feel for it. Once the concrete is poured, the footprint is permanent. The gravel stage is the last opportunity to adjust the deck layout, add square footage, or change the shape. I wanted them to experience the space on their own terms before that decision was locked in.
What Comes Next
At this point the waterfall, jump rock, wading pool, spillway channel, retaining walls, and tile work were all complete. For the first time, it was easy to stand back and see how all of the individual pieces were coming together into a single cohesive project.
The next step would be the concrete decking. The deck would transform the project from a construction site into the outdoor living environment we had envisioned from the beginning. That work is documented in Post 5 — Decking, Interior Finish, Startup, and Completion.
Auburn Vanishing Edge Pool Series:
• Series Hub
• Part 1 — Design
• Part 2 — Engineering
• Part 3 — Construction
• Part 4 — Tile, Waterfall, and Jump Rock (You are here)
• Part 5 — Decking, Interior Finish, Startup, and Completion
Ready to Build?
Custom hillside pools are what we do. If you have a difficult site and a clear vision, let’s talk.