
The gunite shell was in the ground. What followed was the pool tile plaster sequence in Rocklin that turned a structural concrete form into a finished swimming pool. The structural work was done. What came next was the finish sequence — tile, backfill, wall cap, deck, stucco, plaster, and water. Every trade handed off to the next in a precise order, compressed into a window that ended on the same day as my second knee replacement surgery. This is how that final phase ran.
This is Stage 4 of a four-part series documenting the complete construction of a small yard hillside pool in Rocklin, CA. If you are joining mid-series: Stage 1 covers design and site planning, Stage 2 covers excavation, and Stage 3 covers the retaining wall and structural build.
After the Gunite
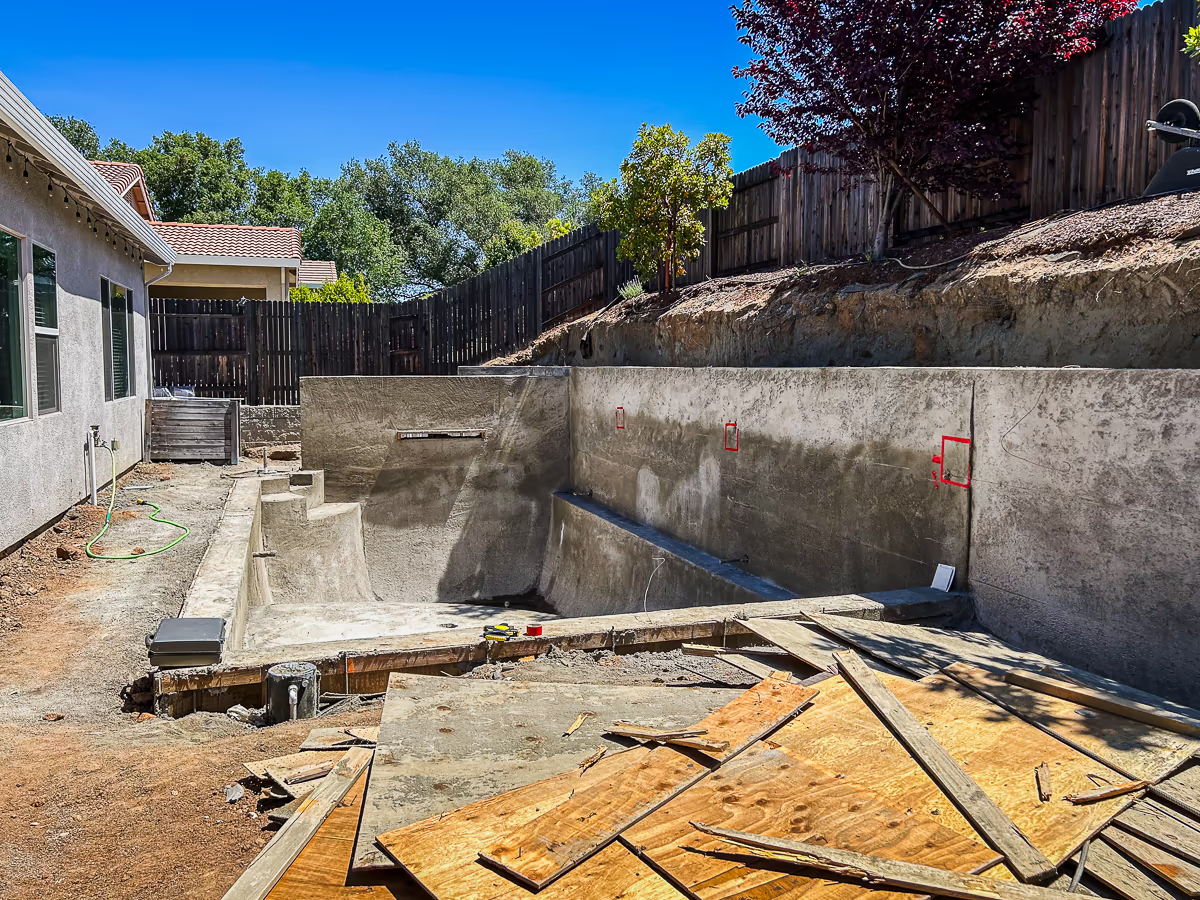
With the forms stripped, the raw structural shell is exposed — and so is the reality of working in a tight hillside yard. Form lumber staged in the foreground, red tape marking the decorative tile accent locations on the retaining wall. In a space this constrained, stripping forms and laying out tile happen in the same window.
When the gunite crew finishes, the shell looks like a pool. It isn’t yet. What you have is a structural concrete form — strong, rough, and not ready for anything else. The engineering specification required a minimum of 14 days of continuous water cure before the forms could come off. We kept it wet, kept it damp, and stayed off it. At 28 days the shotcrete reaches its specified design strength — 2,500 PSI per the engineer-of-record plans. That’s the number the structural engineer specified, and that’s the number we waited for before putting any load against that wall.
Forms came off on May 14th. The tile crew laid out the waterline tile pattern on the bond beam the same day.
Tile Layout and the Color Change
The original contract called for white plaster and an artistic blue tile at the waterline — a combination that worked well with the 3D renderings I had built in Pool Studio during the design phase. Somewhere in the middle of construction my customer came back and said they wanted to go with a darker interior finish. That happens, and it’s not unusual. As the pool takes shape in the ground people start seeing it differently than they saw it on a screen. Color decisions get reconsidered. We work through it.
They wanted Tahoe Blue plaster — a deep charcoal gray — paired with a Slate White 6″ × 6″ tile at the waterline. That combination was new to me. Dark plaster against bright white tile. I had done plenty of dark plaster pools and plenty of white tile pools, but not those two together in one design. Before I finalized the change order I went back into Pool Studio and recolored the 3D model to match their selections exactly. What came back surprised me. The contrast between the Slate White tile line and the dark gray water looked stunning — more dramatic and more finished than the original palette. I was glad I looked before I signed off.
We documented the change formally and I made sure my customer understood one characteristic of this color combination: with white grout and Tahoe Blue plaster, some plaster can migrate into the grout line right at the waterline during application. That’s a normal characteristic, not a defect. It was written into the change order so there were no surprises at startup.
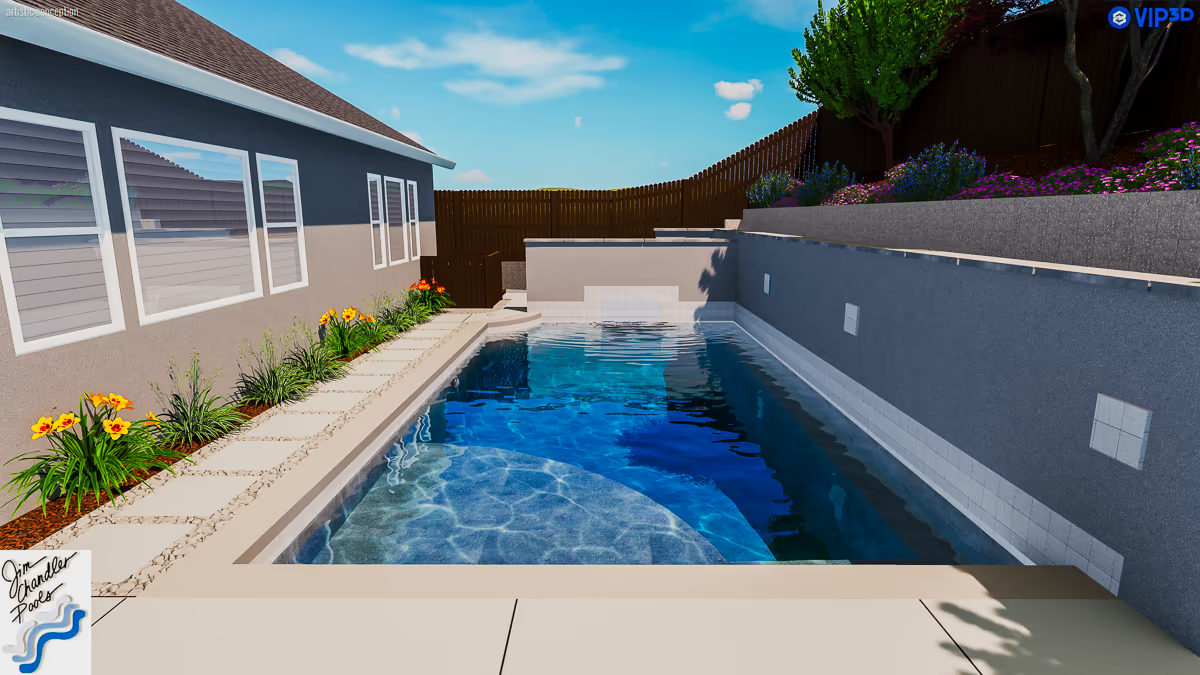
The revised 3D rendering after the color change — Slate White tile and Tahoe Blue plaster. Before signing the change order I recolored the model to show the homeowner exactly what the new palette would look like. The contrast was stunning. This is what convinced us to proceed.
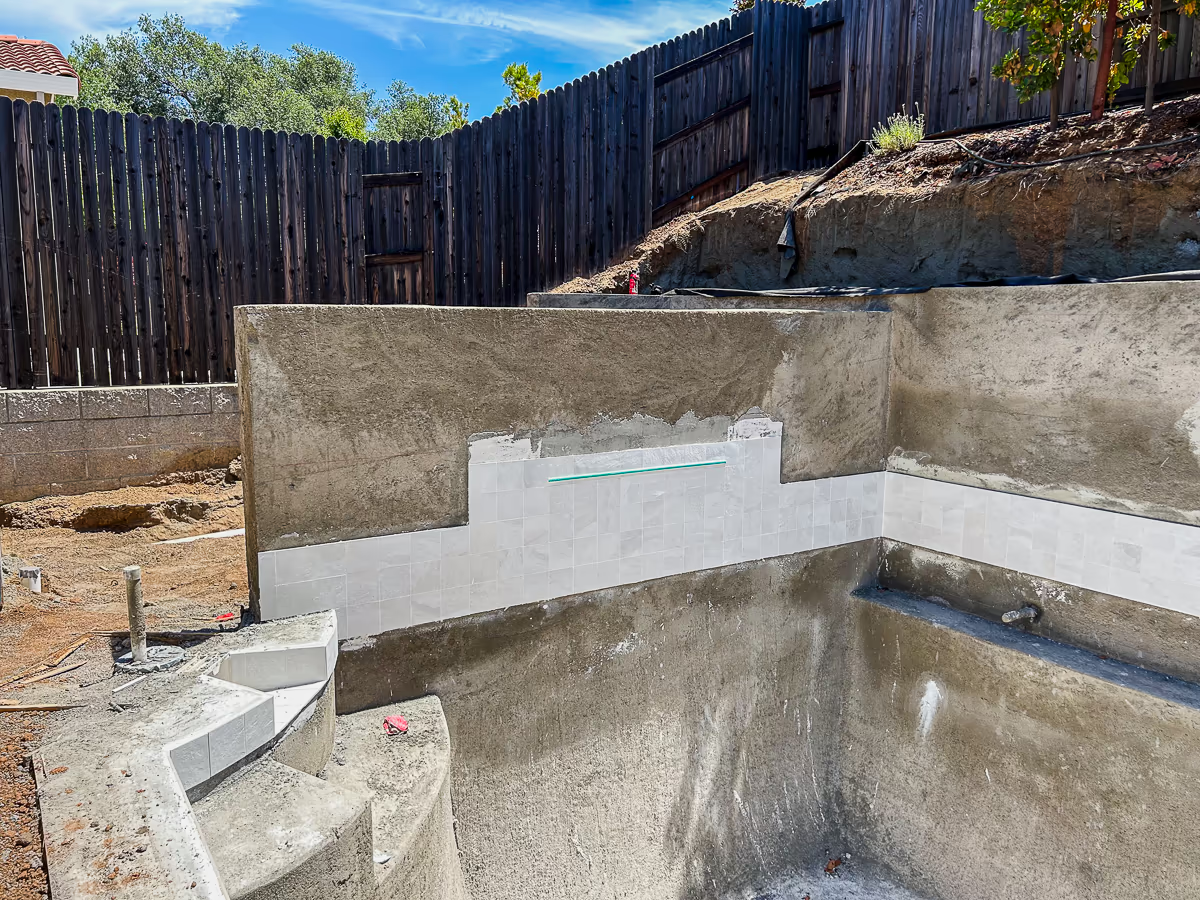
Setting the Slate White 6″ x 6″ waterline tile and prepping the 48″ CMP Classic Falls sheer descent. The green protective insert stays in place throughout construction to keep debris out of the waterfall lip. On this Rocklin project we used back-porting through the gunite wall to keep the plumbing hidden and the profile clean.
Tile was set on May 19th.
The Wall Tile Detail
I had a design problem to solve on that retaining wall. Five feet of gunite, once stucco goes on it, is a large uninterrupted vertical surface. On a smaller pool in a tight yard that wall is always in the picture — it’s part of the composition whether you want it to be or not. I didn’t want it to read as a blank barrier.
I decided to break it up with a tile motif using the same Slate White 6″ × 6″ tile from the waterline. Four Deco tiles arranged in a square pattern, placed at a height and horizontal position that had to feel right in proportion to the pool and the wall. I spent real time on the placement. Too high and it disappears into the wall. Too low and it competes with the waterline tile. Too close to the sheer descent and it gets lost in the water movement.
The sheer descent, the waterline tile, and the wall tile motif all had to work together as a single composition. When the placement finally came together it was exactly what that wall needed — enough detail to give your eye somewhere to land without competing with the water.
French Drain and Backfill
The engineering plans required a French drain system behind the retaining wall. On a hillside build, hydrostatic pressure against a below-grade wall is a real structural load and the drain system is what relieves it. We had planned for this from the excavation phase — purposely over-excavated two feet behind the wall to create the working space to do it correctly.
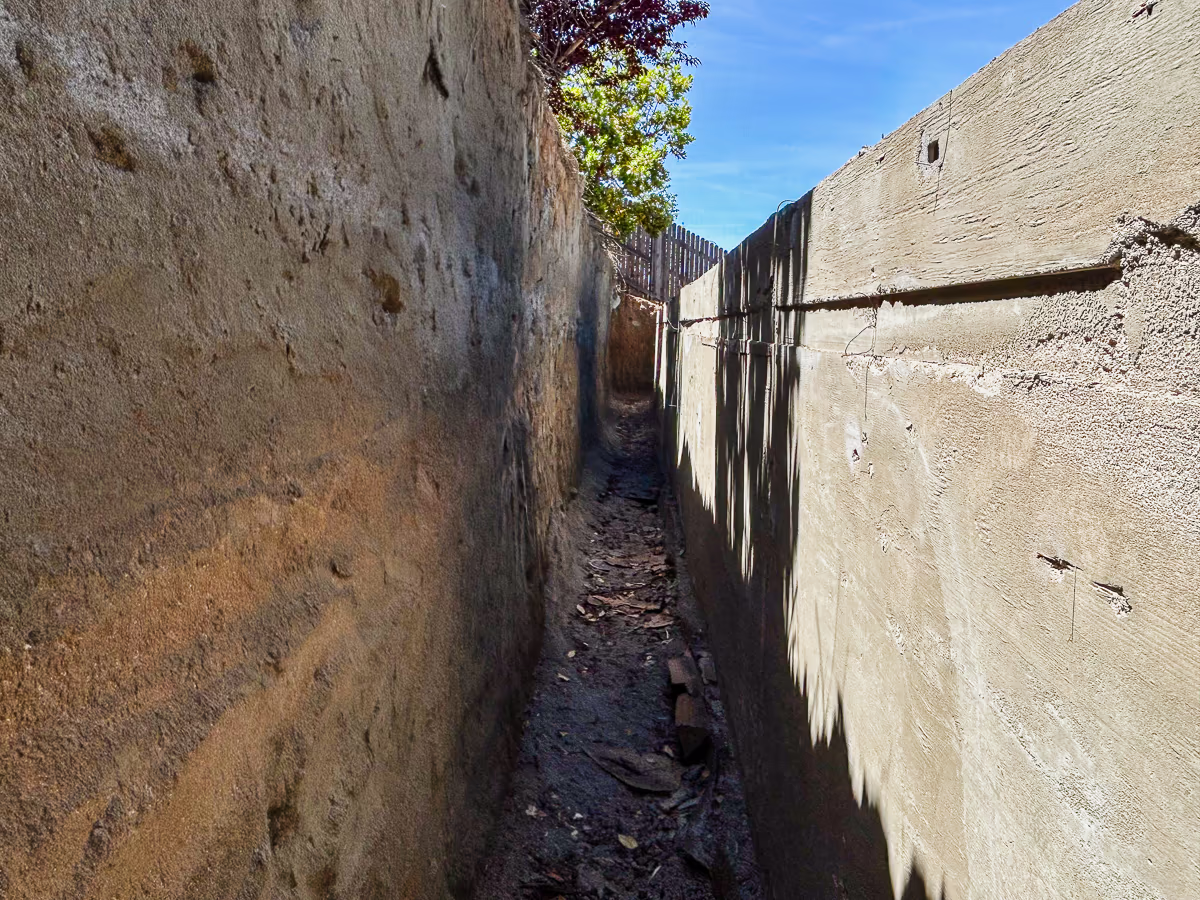
Behind the retaining wall: this narrow corridor shows the hidden structural and access space engineered into this challenging hillside pool project.
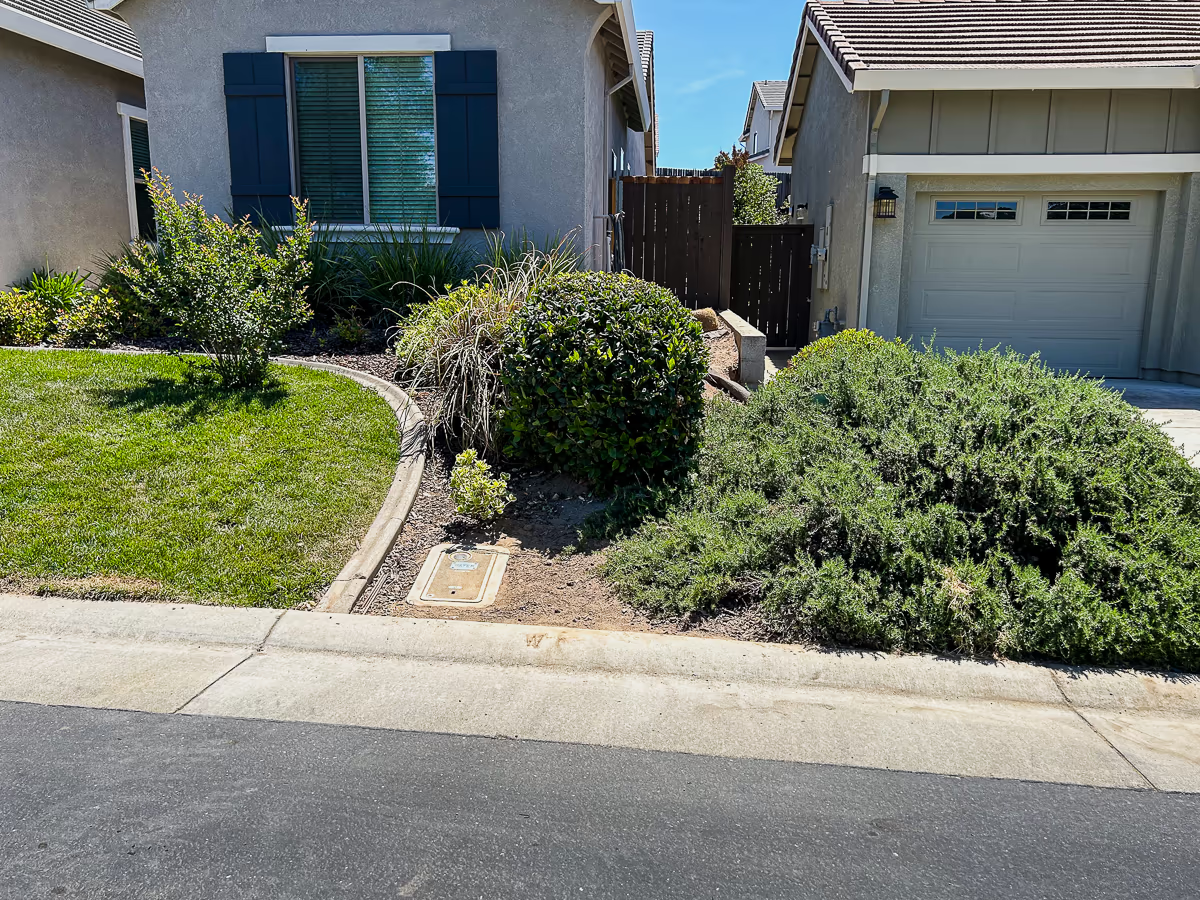
While the crew worked behind the wall — waterproofing, installing drainage, and compacting backfill in lifts — the front of the property stayed clean and orderly throughout.
We waited the full 28 days before beginning backfill. The engineering specification required a minimum compressive strength of 2,500 PSI at 28 days. That’s when the wall reaches its specified design strength. That’s when you put soil against it — not before.
Before any backfill went in, the wall had to be waterproofed. The landscaper prepped the back face of the wall and applied two coats of BG-2000, a high-performance below-grade concrete waterproofing sealer, applied per the manufacturer’s instructions. The construction joints received the same treatment. Against the sealed wall he then installed a sheet drain — a drainage board that creates a clear vertical path for water to move down the face of the wall rather than building up against it.
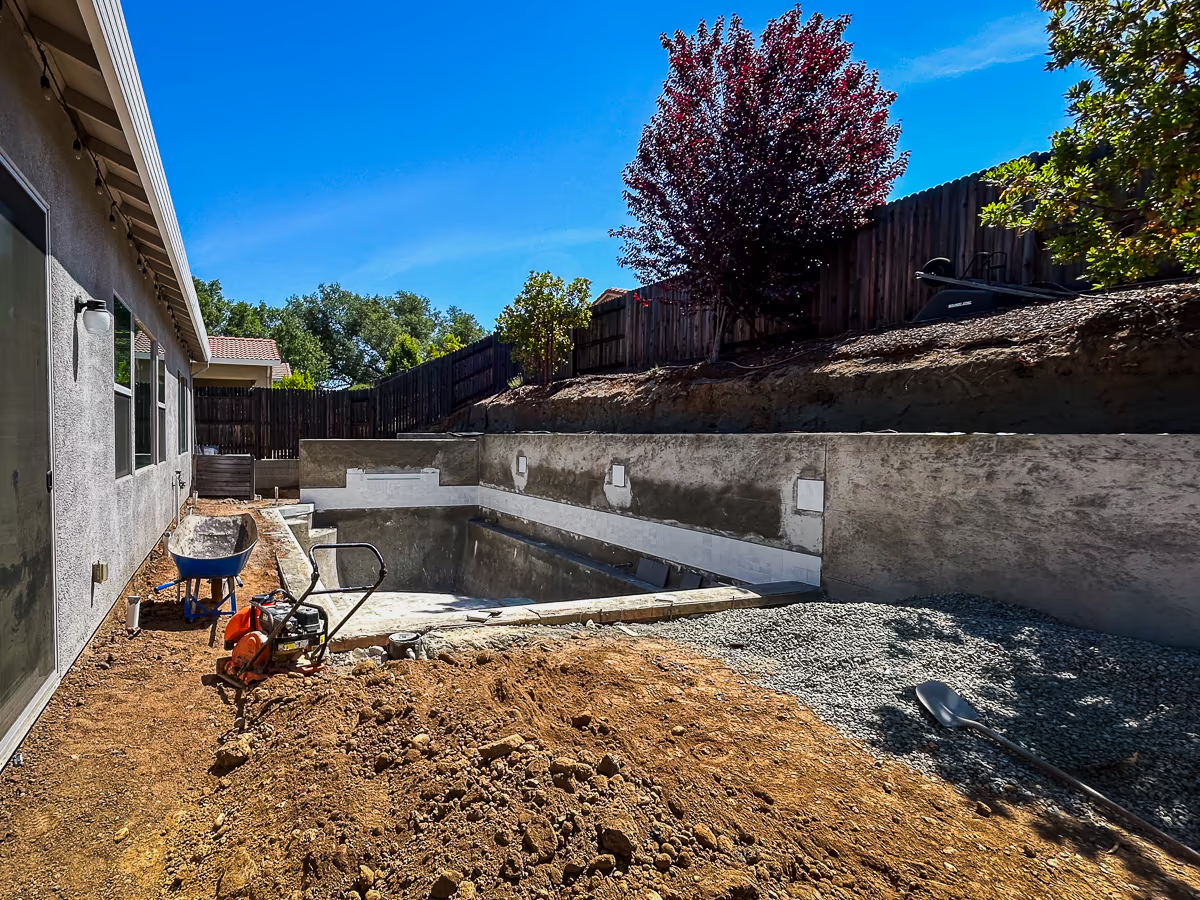
The decorative tile was installed before final grading, while drainage and structural backfill work continued behind the retaining wall.
At the base of the wall, a 3-inch perforated PVC drain line was bedded in 12 inches of drain gravel and wrapped in geofabric. The geofabric keeps soil fines from migrating into the drain rock and clogging the system over time. That drain line is what carries the water away.
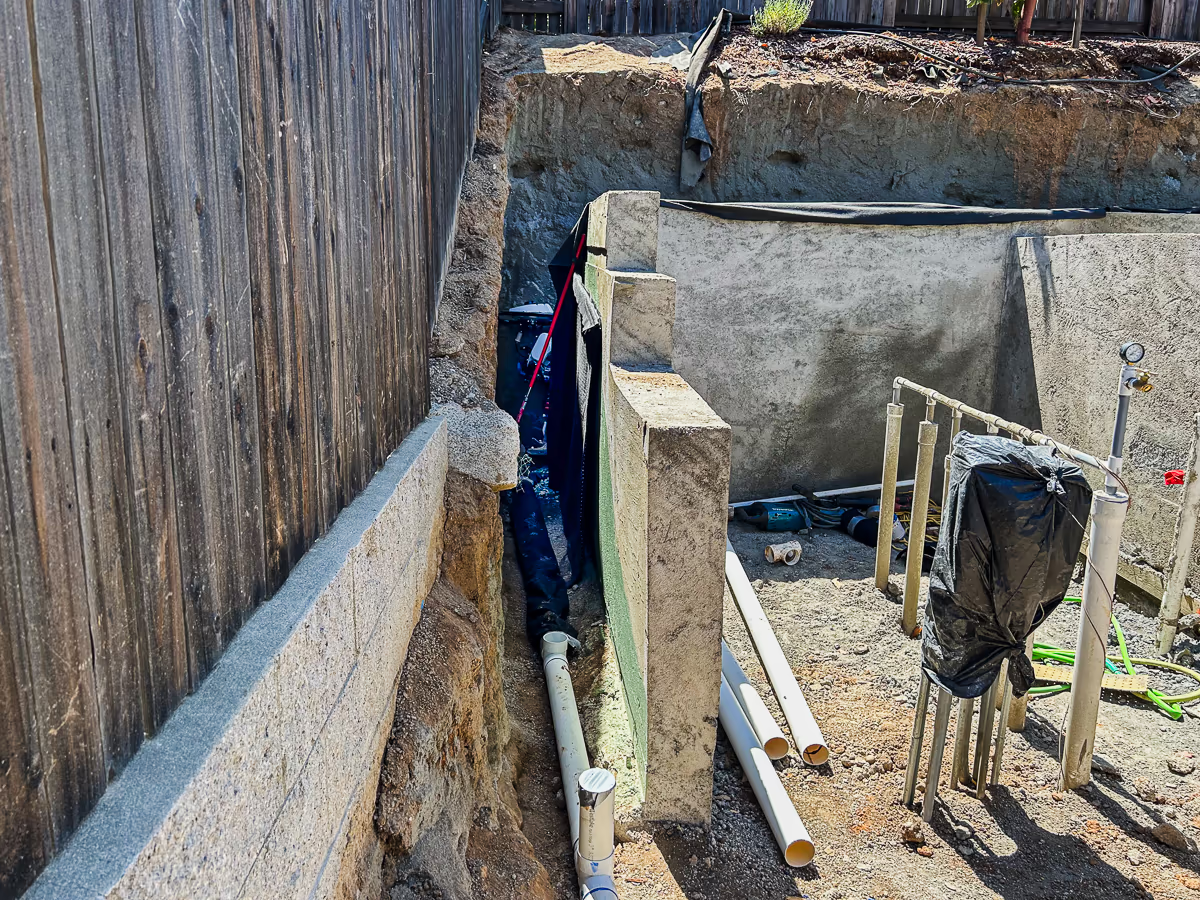
Before backfilling, the landscaper waterproofed the retaining wall with two dampproofing coats, then installed two drainage systems: a composite sheet drain placed vertically against the back wall face, and a 3-inch perforated PVC drain line bedded in 12 inches of drain gravel wrapped in geofabric at the base of the wall. The engineer required one method — we installed both.
The backfill itself was placed in 6-inch lifts and hand-compacted at every layer with a jumping jack vibratory compactor. There is no shortcut to this. Poorly compacted backfill settles unevenly, pulls away from the wall, and creates voids that undermine the finished grade above. Done correctly it takes time — and this took time.
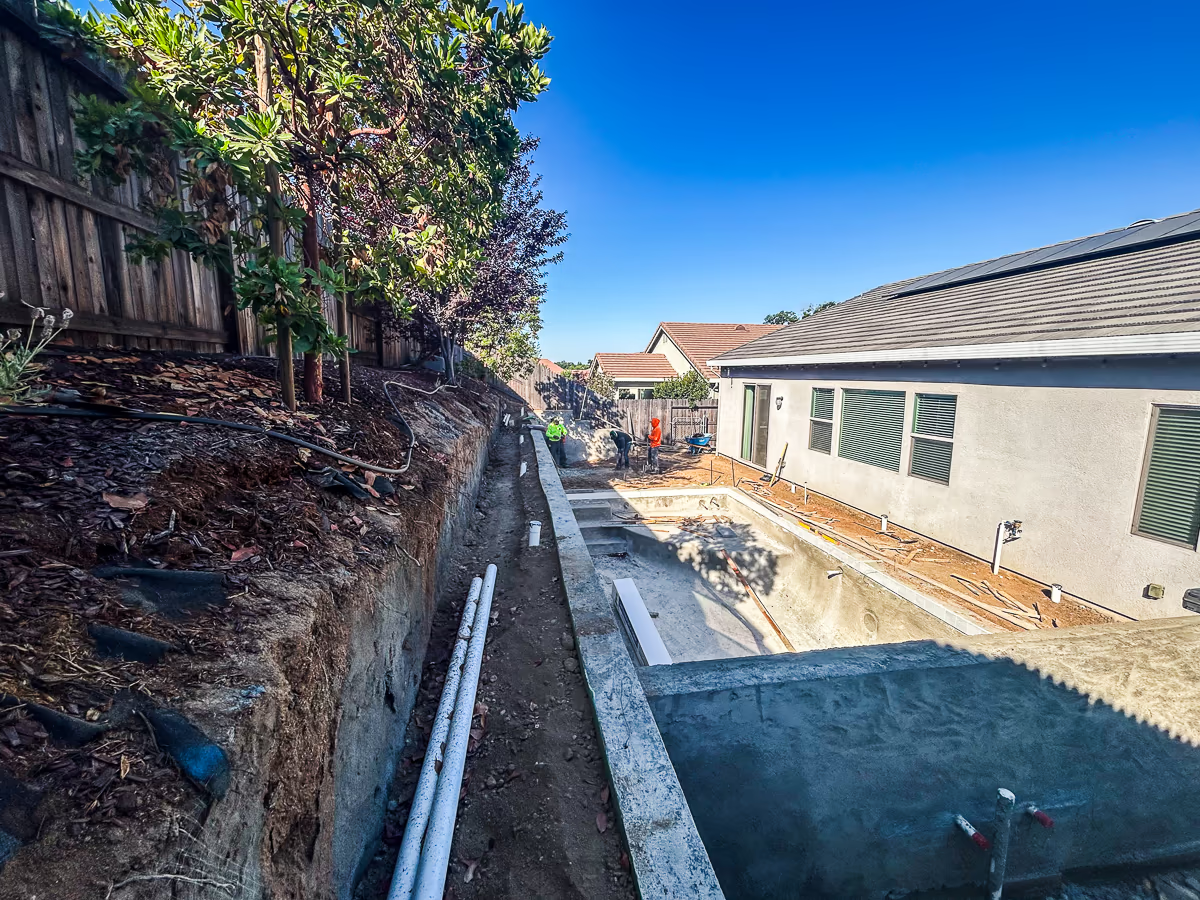
Behind this retaining wall, I designed two separate drainage systems: a perforated 3-inch French drain at the base of the wall to relieve hydrostatic pressure, and a separate solid 3-inch surface drainage line to capture hillside runoff before it reaches the wall. The landscape contractor handled installation of both.
When it was finished, the wall had a sealed back face, a drainage plane, a perforated collection line in clean drain rock, and fully compacted soil in lifts all the way to subgrade. That system is behind the wall for the life of the pool.
Wall Cap — Eldorado Stone Blue Steel
The original plan had no wall cap — budget was the deciding factor. A flat gunite top is structurally complete — it doesn’t require one. But the more I looked at that wall during construction, the more I felt it needed a cap. I ran it by the homeowner — explained what it would do for the wall and what it would cost. They asked me to price it out. When the number came back they decided it was worth it. A cap gives the wall a finished top edge, protects the stucco from direct rain exposure, and adds a small overhang that keeps water from running straight down the face. It makes the wall look intentional.
I showed the customer two color options from the Eldorado Stone Split Edge Wall Cap line — Blue Steel and Grey Sky. Before anything was ordered I went to the material yard myself and purchased samples of both. These caps are heavy — the crew carried them into the backyard and placed them right in the pool next to the tile so the customer could see everything together in the actual light of the actual space. That matters. A product looks one way on a website, another way sitting next to the stucco color samples and the Slate White waterline tile. They chose Blue Steel. It’s a 12″ × 30″ cap set in plain gray cement with approximately a half-inch mortar joint. About 87 linear feet runs along the top of the retaining wall and equipment screen wall.
The customer selected Shark Gray from the Omega Stucco color chart — a shade they felt matched their house color direction. Once the color was locked I ordered samples in different finish textures. When the samples were ready — about a week later — I brought them out and set them alongside the wall cap stones and tile. The customer could now see the Eldorado Stone Blue Steel cap, the Slate White waterline tile, and the Omega Shark Gray wall color all in one place, in their own backyard, in the light of the actual space.
That’s how you make a color decision you can live with. Not from a screen. From samples in the space.
The wall cap was installed on June 12th by the tile crew.
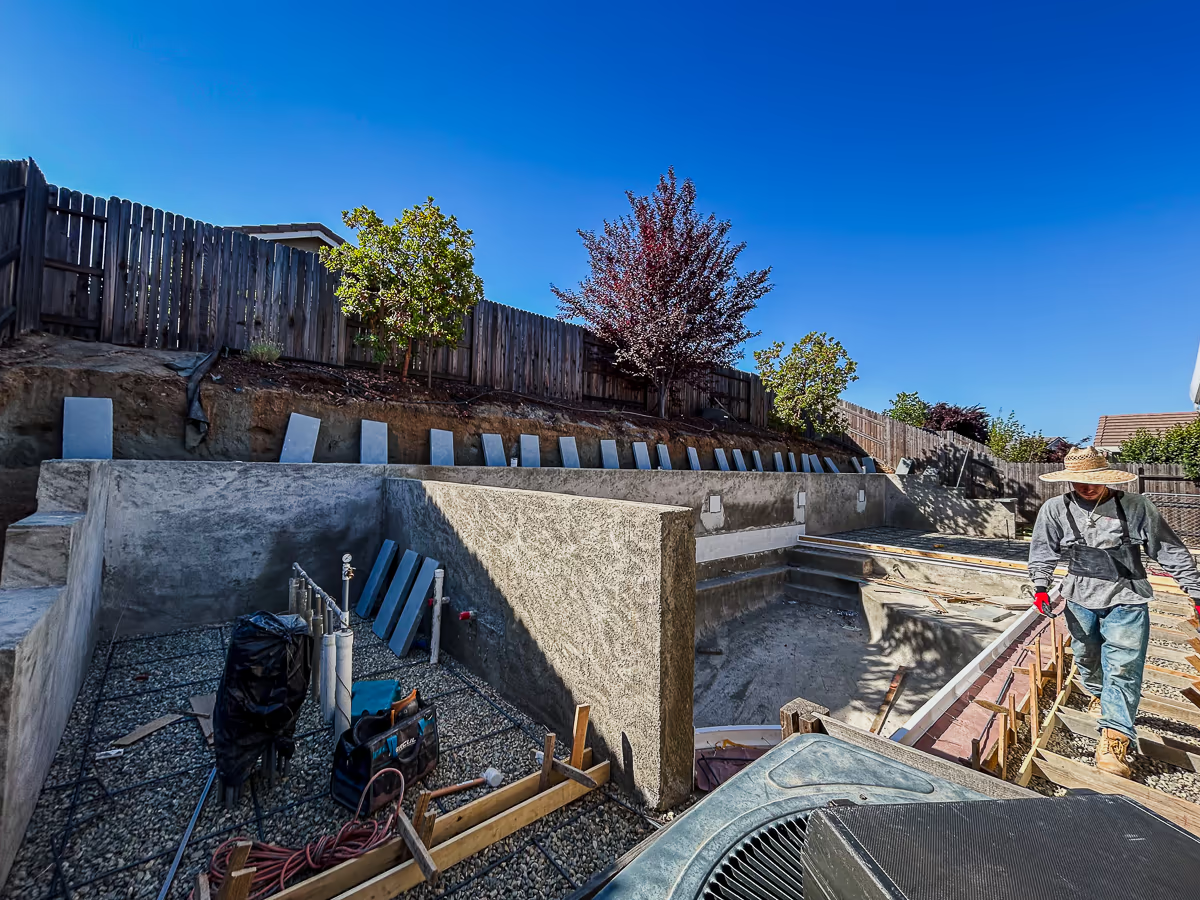
Setting the Eldorado Stone Split Edge Wall Cap in Blue Steel — cap stones staged along the top of the gunite retaining wall for dry fitting. The sample stone on the tanning shelf is where the homeowner reviewed the cap color alongside the Slate White tile before installation was confirmed. About 87 linear feet of cap runs along the main retaining wall and equipment screen wall.
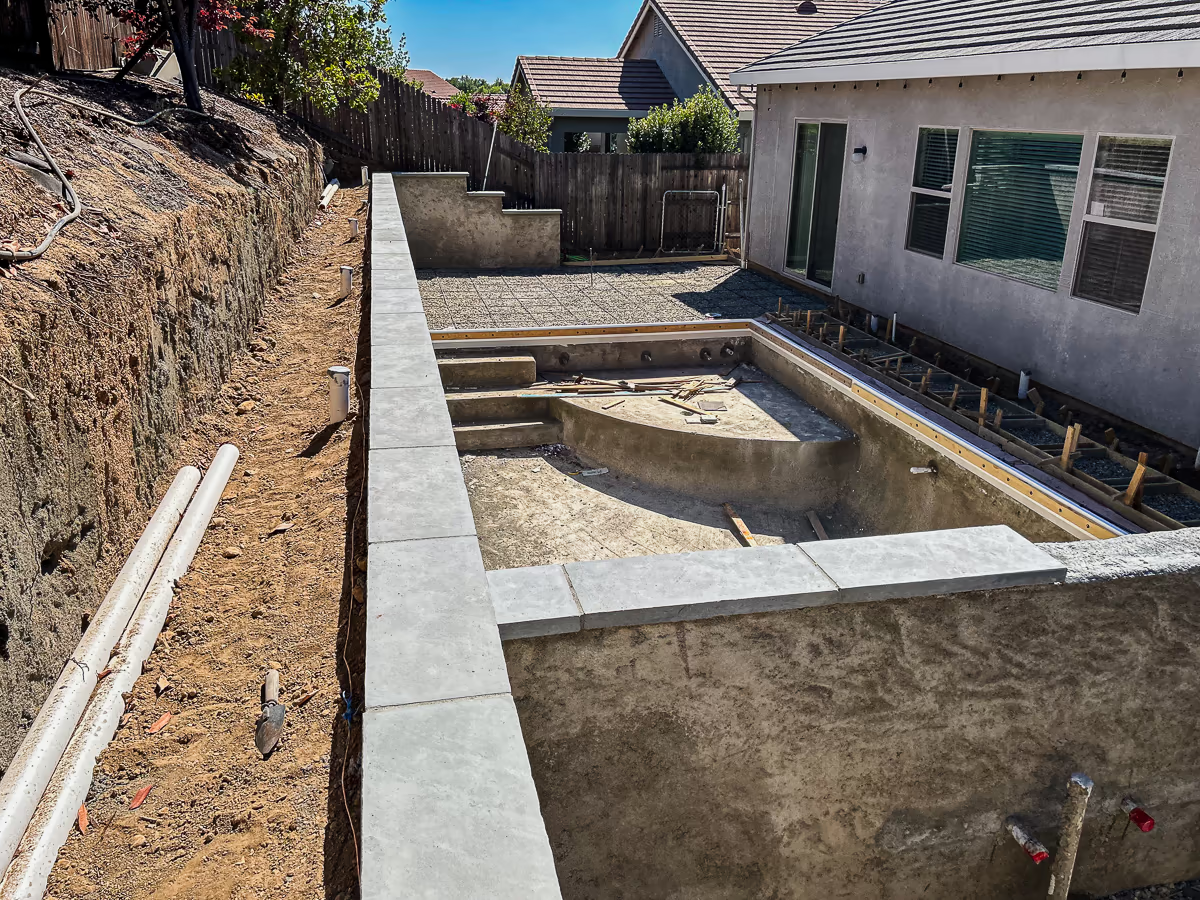
Looking back across the site — Eldorado Stone wall cap complete on the gunite retaining wall, pool shell formed with tanning shelf and steps, deck rebar on both sides, and surface drain running along the hillside cut. The project is in its final structural phase before concrete.
The Call
On June 10th we set the deck forms. The next day — June 11th — I had a post-surgical appointment with my orthopedic surgeon at 3 Medical Plaza Care Center at Sutter Roseville Hospital for my left knee. My right knee replacement had originally been scheduled for November — but at my post-op follow-up for the left knee, my surgeon told me he had an opening on June 26th. He said I was doing great and asked if I wanted to move it up. He needed an answer that day.
When I walked out the main entrance I sat down on a concrete bench under a shady tree and called my customer.
I asked him if it would be okay with him if I moved my right knee surgery up to June 26th — two and a half weeks out. He said it would be fine as long as it didn’t delay his pool. I told him it wouldn’t — the pool would be finished on schedule. I told him I could even try to finish it ahead of schedule.
That conversation settled everything. I knew exactly what had to happen and in what order between June 11th and June 26th. Every trade was already on the calendar. Every inspection was already scheduled. The job was going to run itself — I just had to make sure the sequencing was right.
The pre-deck inspection from the City of Rocklin happened the same day, June 11th.
Concrete Deck
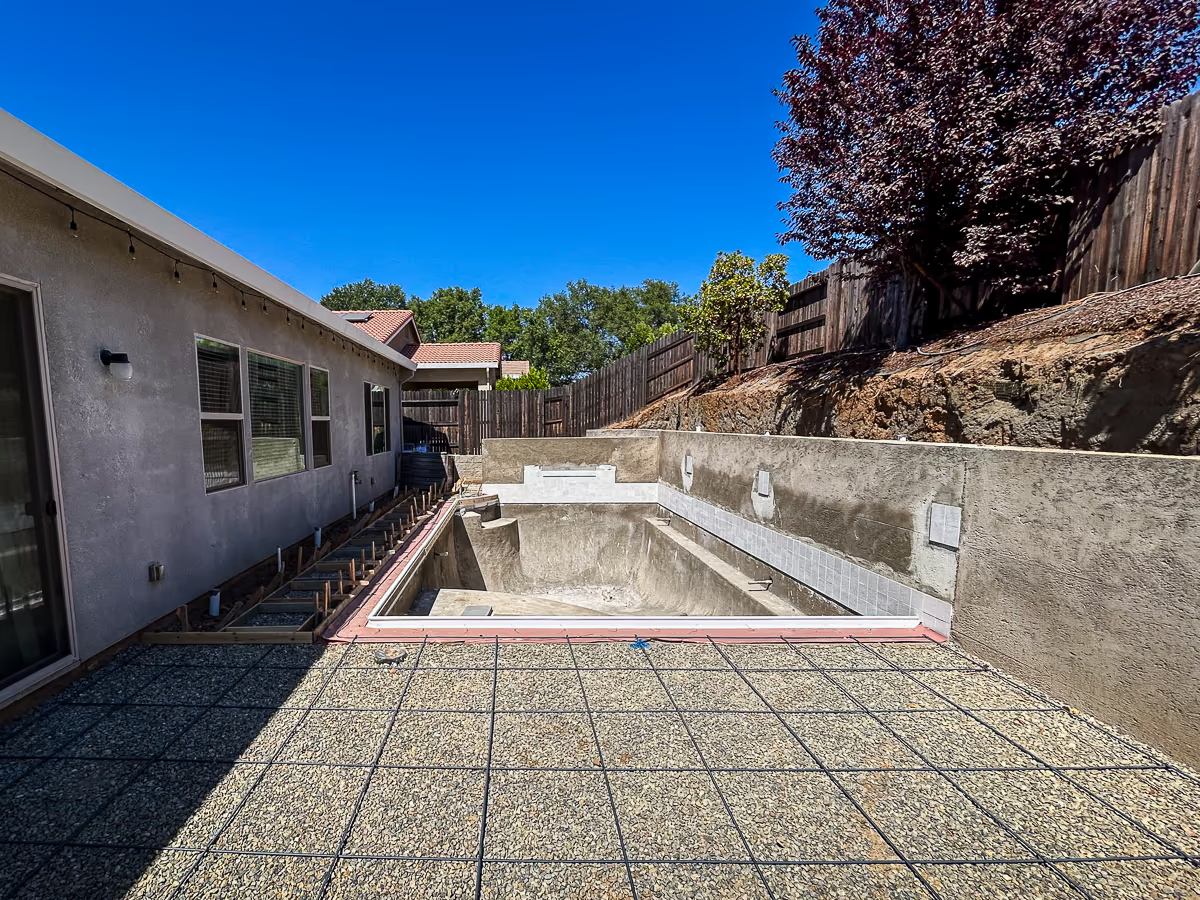
The deck subgrade is set — compacted gravel base, rebar grid tied, and bond breaker paper installed over the gunite bond beam. The bond breaker prevents the concrete deck from adhering to the gunite shell, allowing each structure to expand and contract independently. Everything is ready for the concrete pour.
June 14th — concrete deck poured. After the pour you wait. We gave it five days before walking on it. Fresh concrete that takes traffic too early shows it for the life of the deck. The deck slope was set to drain away from the pool and away from the house foundation — water management doesn’t stop at the pool shell.
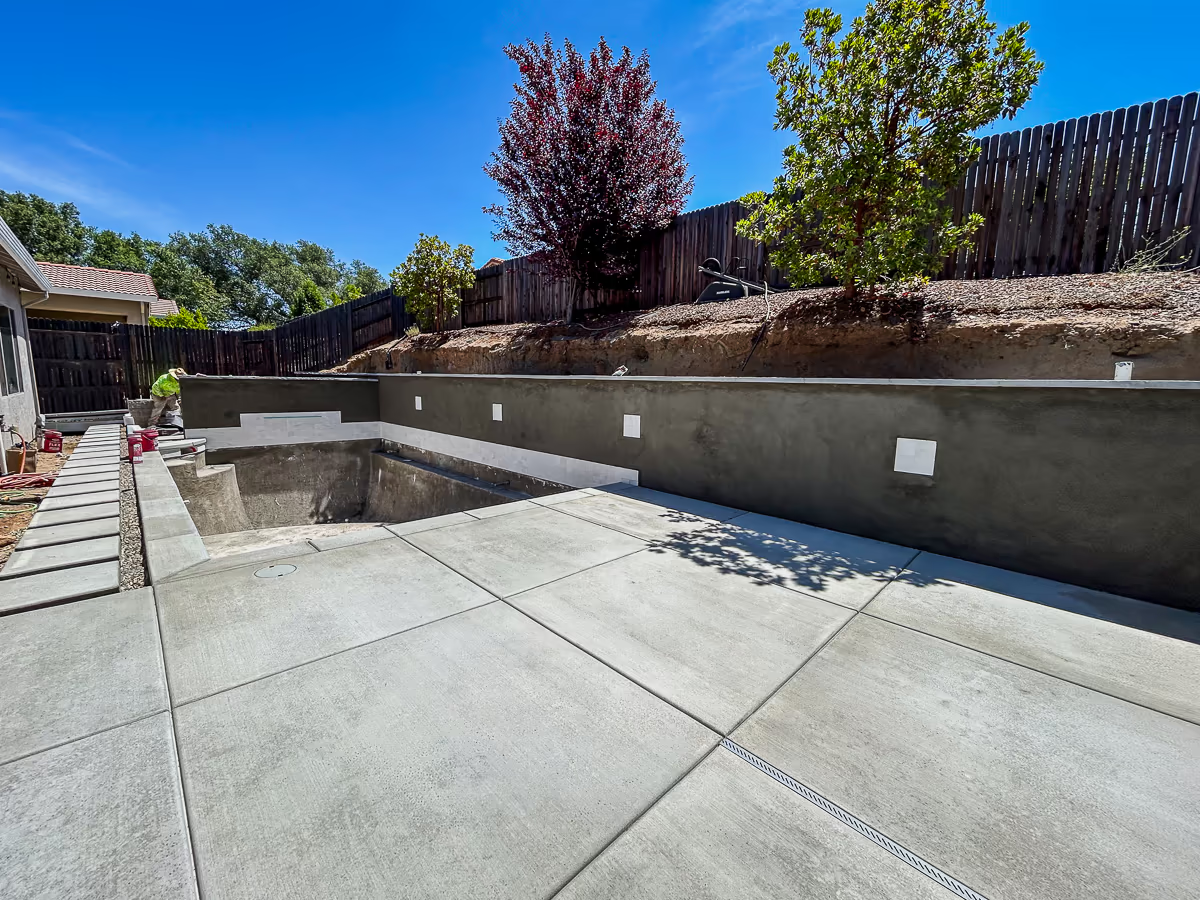
The concrete deck is poured and cured — large format broom-finish panels with clean control joints and stepping pads along the side yard. The retaining wall has received its stucco brown coat and is ready for the Shark Gray finish coat. The stucco crew is still on site refining the wall surface.
Stucco — Shark Gray
Before the stucco went on, there was a process decision to make. I don’t build a lot of stucco retaining walls. The reason we chose stucco on this project was straightforward — tile or stone veneer on a five-foot wall at this scale would have cost significantly more. The tile installer who gave me the original quote planned to seal the face of the gunite and stucco directly over it without a brown coat. I called the Omega Stucco representative to verify that approach. He confirmed it would work — but said I’d need to use a coarse finish to hide the irregular gunite surface. That wasn’t the look I wanted for this wall.
I asked him for a referral to an actual stucco contractor. That installer walked me through the correct procedure: prep and seal the wall first, then a brown coat to build out and level the surface, then a fine acrylic finish over it. It was going to cost more and take more time. I decided it was worth it — the customer was going to get a smoother, better finished wall.
When I saw the finished Shark Gray surface I was glad I made that call.
June 19th we prepped the gunite retaining wall for its finish coat system. The first step was applying Omega Bondcrete bonding glue over the gunite face, followed by a traditional brown coat floated to a flat wall finish. The brown coat builds out and levels the raw gunite surface. Without it, every irregularity in the concrete telegraphs straight through the finish coat. The brown coat was water-cured, then left to set before the acrylic finish went on.
The finish coat is Omega Smooth Coat Acrylic in Shark Gray — Color Code 1C120. One coat of primer, then two coats of acrylic. When it cured it produced the smooth, consistent gray wall surface you see in the finished photos — the right visual complement to the Eldorado Stone Blue Steel cap above it and the Slate White tile at the waterline below.
Finish coat went on June 25th and 26th.
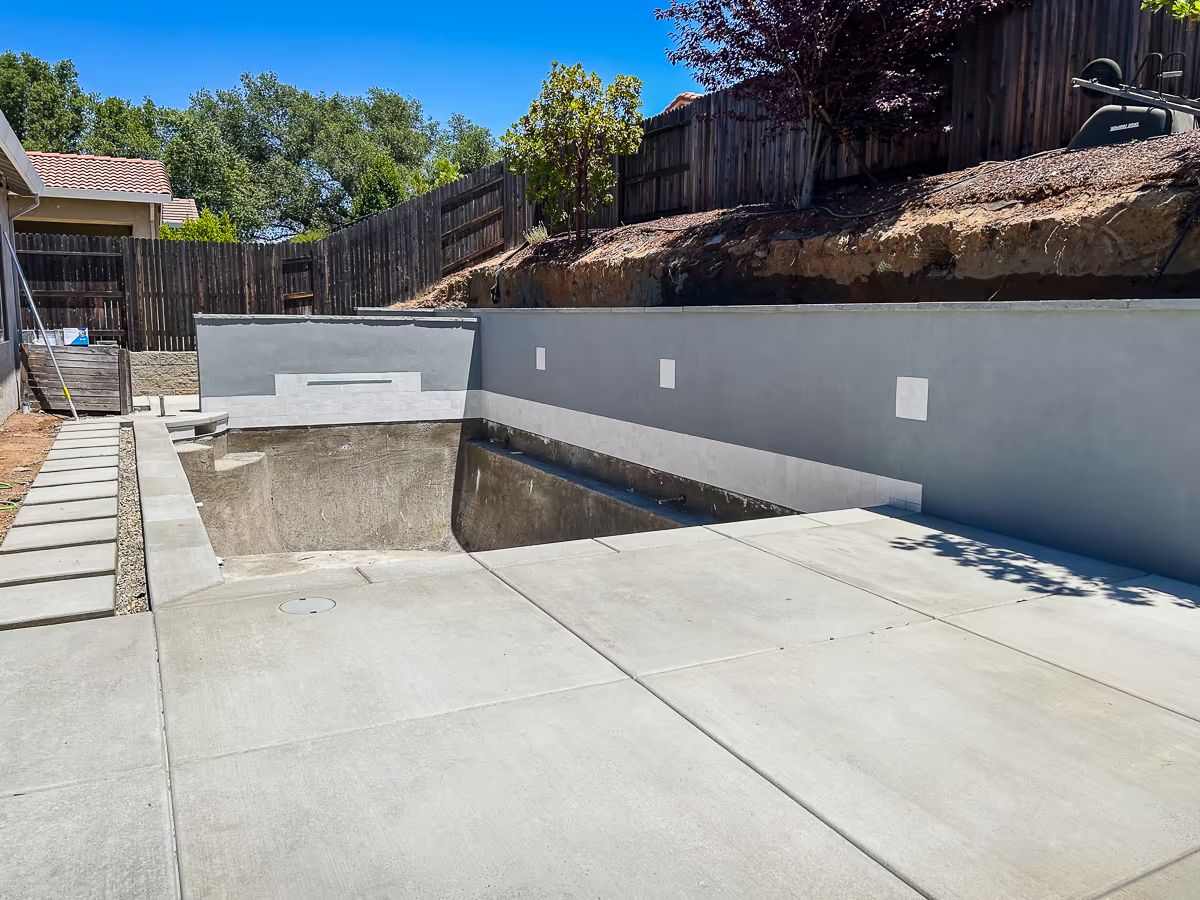
The retaining wall is finished with Omega Smooth Coat Acrylic in Shark Gray, Color Code 1C120, over the brown coat base. Above it, the Eldorado Stone Blue Steel cap completes the wall edge; below it, the Slate White waterline tile ties the wall back into the pool. This is the three-material composition shown in the 3D rendering months earlier.
Fence, Gate, and Equipment
June 23rd — the landscapers reinstalled the access fence and gate to Rocklin code. Pool safety compliance required a self-closing, self-latching gate that swings away from the pool. That had to be in place and inspectable before we could move to plaster.
Equipment was delivered June 24th — pump, filter, and the full mechanical package. The equipment area on this project was tight. Because of the space constraints, equipment had to be delivered before the stucco crew finished but couldn’t be installed until they were clear — there simply wasn’t room for both operations in that area at the same time. Equipment installation happened June 27th.
Surgery Day
June 26th was two things at once. The finish coat stucco was completed. And I had my right knee replacement surgery.
I had gone into this project with two knee replacements planned — left knee in February, right knee later in the year. The left went in on March 4th after a delay. I was back on that job site six weeks later walking with a cane. Now, on the last significant construction day of this project, the right knee went in.
My crew finished the stucco. I was in surgery.
The Final Sequence
June 27th — equipment installed. Pool cleaned and prepped for the interior finish.
June 30th — pre-plaster inspection from the City of Rocklin. The inspector verified pool safety compliance: the self-closing and self-latching gate, the door alarms, and the floating pool alarm on the premises. That inspection cleared us for plaster.
July 1st — the pool was plastered in Tahoe Blue. Plaster goes in as a single continuous operation. Once the crew starts, they finish. The fill begins immediately after. Fresh plaster cannot be allowed to dry out — water goes in right behind the crew.
July 2nd — startup. Water in the pool. Sixteen days ahead of the original July 18th schedule.
What Came Through: The Finished Rocklin Pool
I was lying in a hospital bed icing my leg when the text came in. There was water in the pool.
That’s the message you want after a project like this. A yard that looked unbuildable in September of 2024 had a finished, working swimming pool in it by the second day of July 2025. My customer had water before the Fourth of July weekend. Every trade delivered. Every inspection passed.
Both knees replaced. Pool finished. Customer happy.
That was this project.
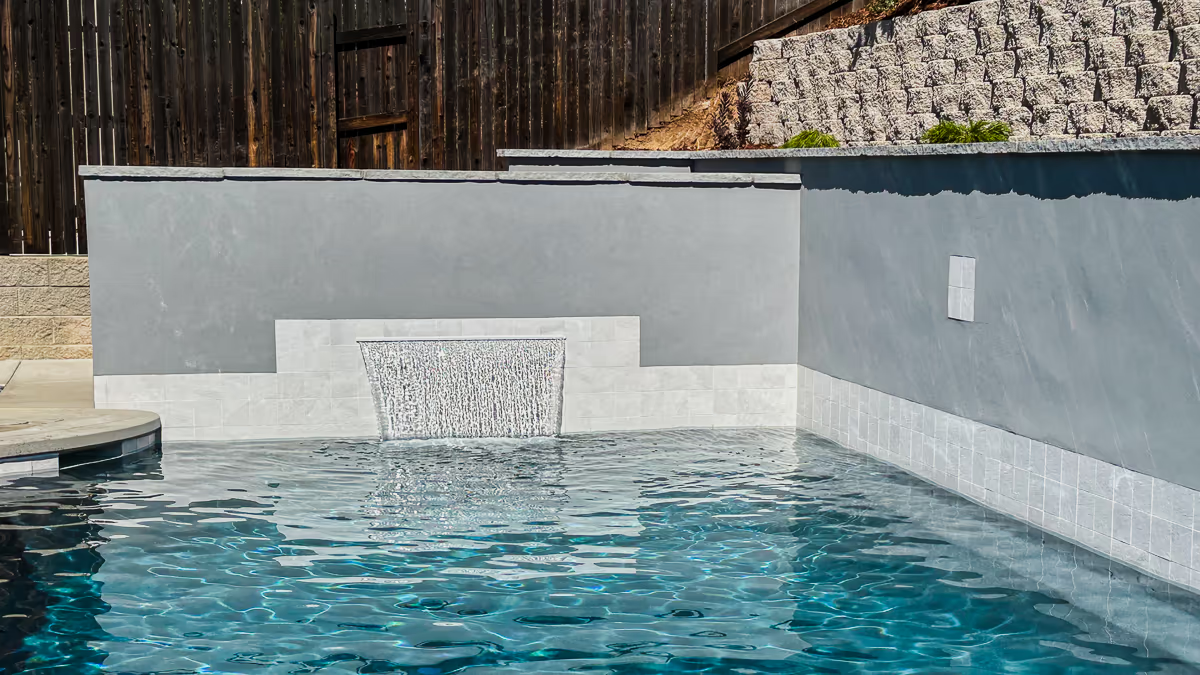
The 48-inch CMP Classic Falls sheer descent is running — back-ported through the gunite wall so the plumbing stays completely hidden. Tahoe Blue plaster, Slate White tile at the waterline, and Omega Shark Gray stucco create the exact composition shown in the 3D rendering nine months earlier.
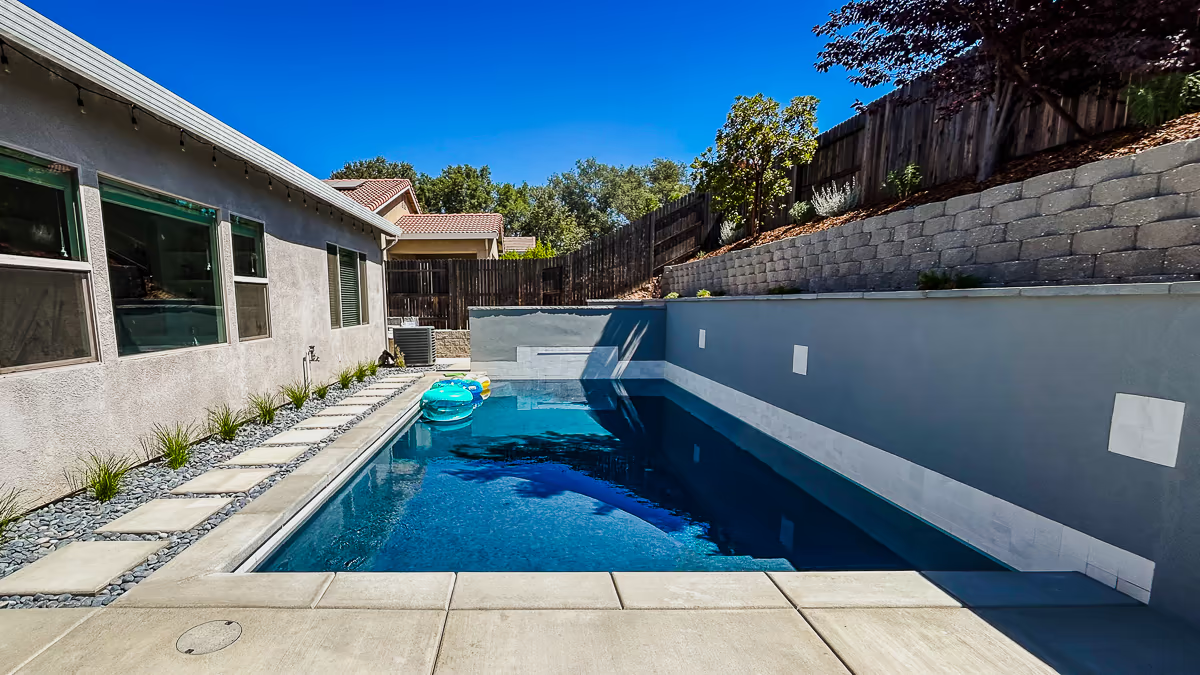
The finished pool — Tahoe Blue plaster, Slate White tile at the waterline, Omega Shark Gray stucco on the five-foot gunite retaining wall, and a stepping stone walkway through the side yard. A backyard that looked unbuildable in September 2024 had water in it by July 2, 2025.
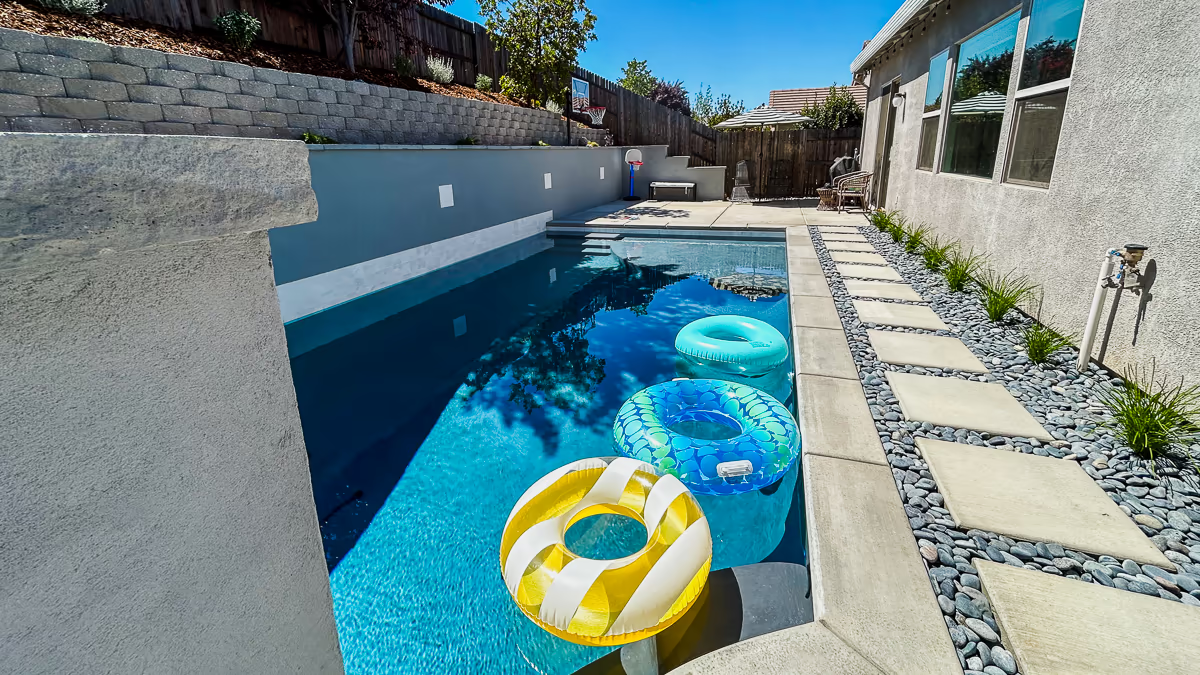
The yard that looked unbuildable is now the backyard the family actually uses. Stepping stone walkway, river rock, ornamental grass, and a pool full of floats — this is what the project was for.
T.K. — Rocklin Client
5 out of 5 stars |
Read the Client’s Google Review | March 2026
Worked with Jim to design a pool in our small tight backyard. Came out great. Very happy. Kids love it. And was able to create more space than expected. Jim was very communicative and returned calls and answered questions in a timely manner, which is very important to us.
If you’re looking at a steep yard or a space others have said can’t be built, the first step is finding out what’s actually possible.
Does your yard have slope, limited access, or both?
The first step is a complimentary site consultation to determine what is actually buildable. If the project is a good fit, we enter a paid Design & Planning Agreement where I develop your project in full 3D — every curve, grade transition, and site-specific detail designed around your property. The fee is credited 100% toward your construction contract.
Jim Chandler Pools Inc. has been building custom gunite pools in Rocklin, Placer County, and the greater Sacramento region since 1990. CSLB C-53 License #585004. Return to the Rocklin Small Yard Pool project overview.