
Hi, Jim Chandler here. In my previous post, we covered the intricate world of structural steel and hydraulic plumbing. With the rebar tied to engineering specs and the plumbing lines holding steady under pressure, we received the green light from the Placer County inspector. Now, the project reaches its most transformative moment: Gunite Day.
This is the day the skeleton of the pool is covered by a high-pressure application of concrete, creating the monolithic shell that will hold thousands of gallons of water on this steep Colfax hillside. In a vanishing edge project of this scale, the gunite phase isn’t just about covering steel; it’s about structural integrity and precision geometry.
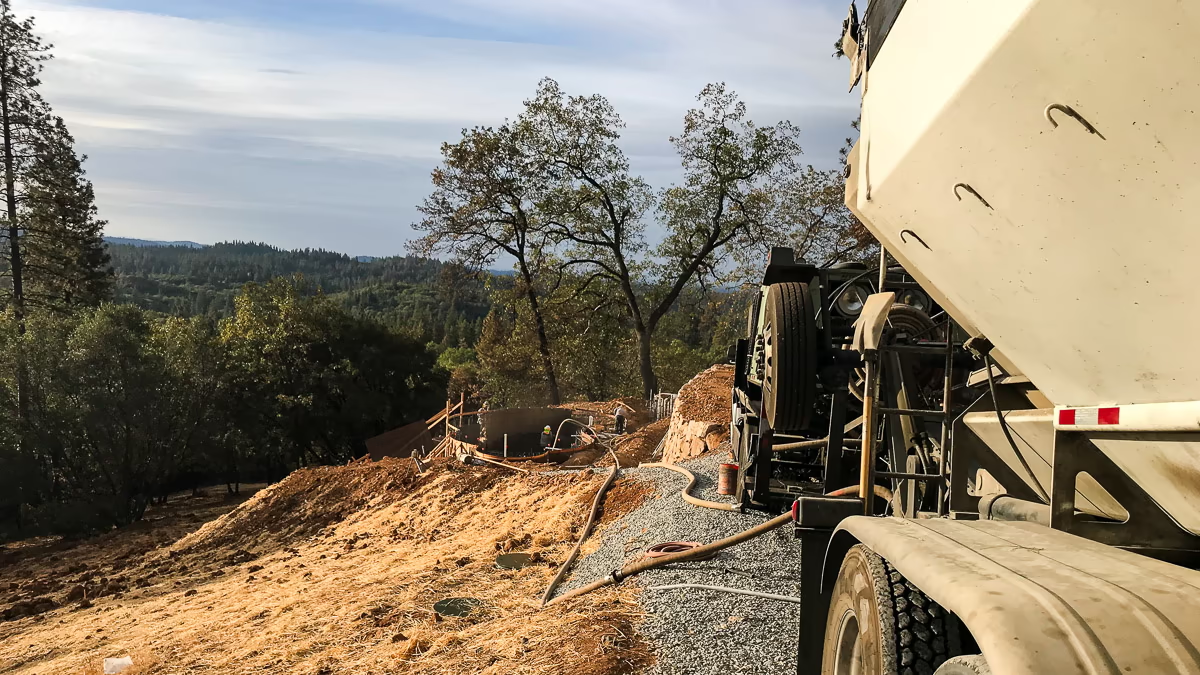
With the pre-gunite inspection passed and the structural steel approved, we were finally cleared to schedule the shoot. This post documents what gunite pool construction looks like on a demanding Colfax hillside — from the first mixer truck on site to a fully cured shell. My client had trusted the construction details entirely to me. That kind of trust carries real weight, and consequently, I treat every decision on a job like this as my own.
Gunite day is one of the most active days of any build. Up here in the Sierra foothills, just driving to the site sets the tone. Because the access road was narrow and every foot of space belonged to the mixer trucks and compressor rig, I parked well down the hill and walked in. I made my way alongside the equipment on the way down, engines loud enough that my ear protection was on before I reached the shell. The crew was already moving.
Standing at the edge of that excavation in the early morning light, the scale hit differently than it does on paper. This was not a standard pool. Below the floor, we had placed a 6-foot-deep, 2-foot-wide keyway — a continuous rebar trench that anchors the shell into the hillside like a foundation. Furthermore, rising above it, the towering rebar cage of the vanishing edge wall stood against the Sierra Nevada in the distance. I’ve been on a lot of gunite days. I’ve never stood at the edge of an excavation quite like that one.
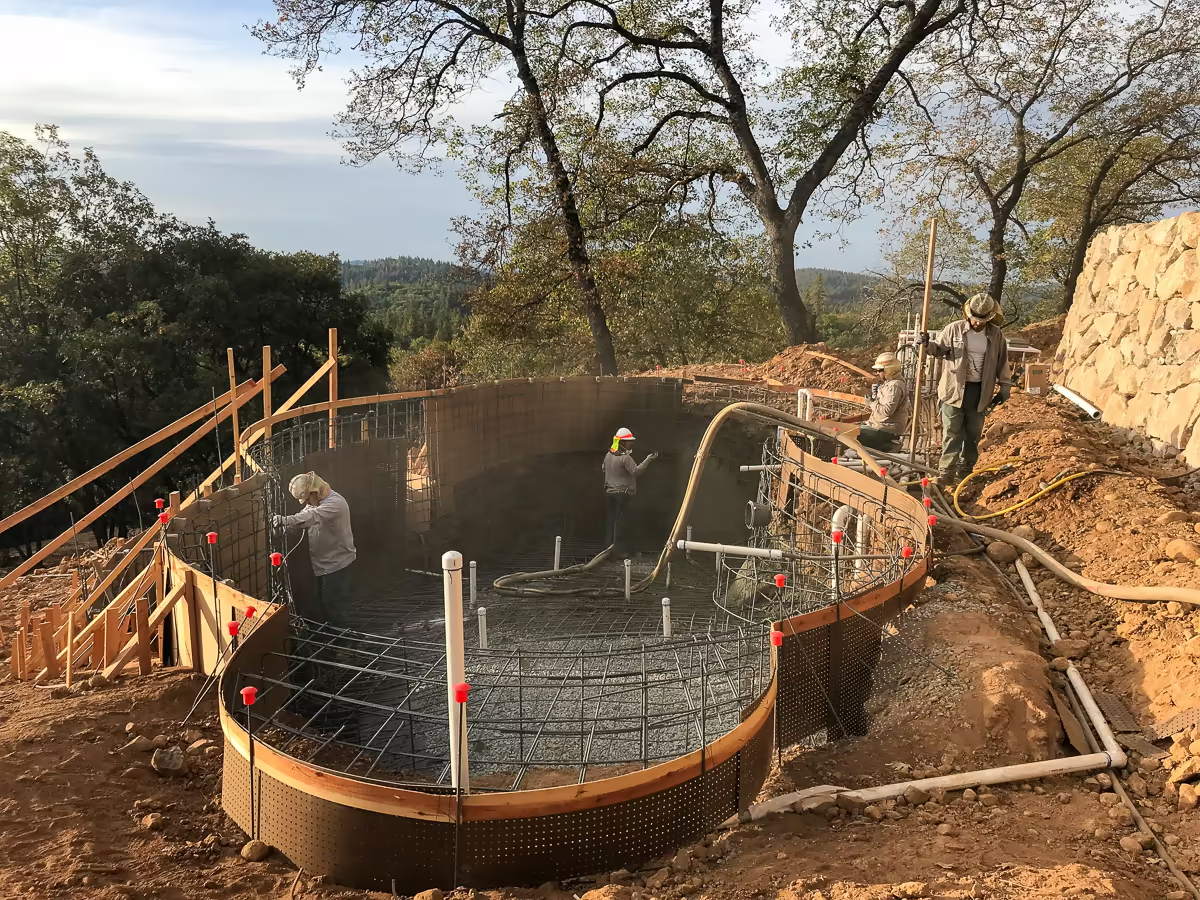
What Is Gunite Pool Construction?
Gunite pool construction uses a dry-mix process: we blend cement and aggregate dry, deliver the mix through a high-pressure hose at approximately 90 PSI, and add water precisely at the nozzle tip on contact with the surface. This gives the nozzleman real-time control over mix consistency that no batch plant can replicate. Because we spray rather than pour, gunite conforms to virtually any geometry — freeform designs, vanishing edges, steep hillside excavations — which is why it is the standard for high-end custom pool construction.
Our structural application conformed to California Building Code Sections 1903.1 and 1910, ACI 318, and ACI 506. Cement used in the mix complied with ASTM C150.
One byproduct of the spray process is rebound — material that bounces off the surface during application. Rebound contains a reduced cement ratio and inferior bond characteristics compared to properly placed gunite. In accordance with ACI 506 and project specifications, rebound is removed and discarded and is never incorporated into any portion of the pool structure.
Gunite Pool Construction Standards We Follow on Every Job
Every pool we build is placed in accordance with engineered specifications. Cement-to-aggregate proportions are not less than 1:5 in conformance with CBC 1910 and ACI 506. Minimum wall thickness is 7 inches. The specified minimum compressive strength for the pool shell is 2,500 PSI — a threshold that the properly proportioned gunite mix should greatly exceed.
After placement, the shell is kept continuously damp for a minimum of 14 days to promote proper curing and strength development. Electrical bonding and grounding components are secured prior to gunite placement in accordance with structural and code requirements.
You may verify California Contractor License #585004 directly with the CSLB.
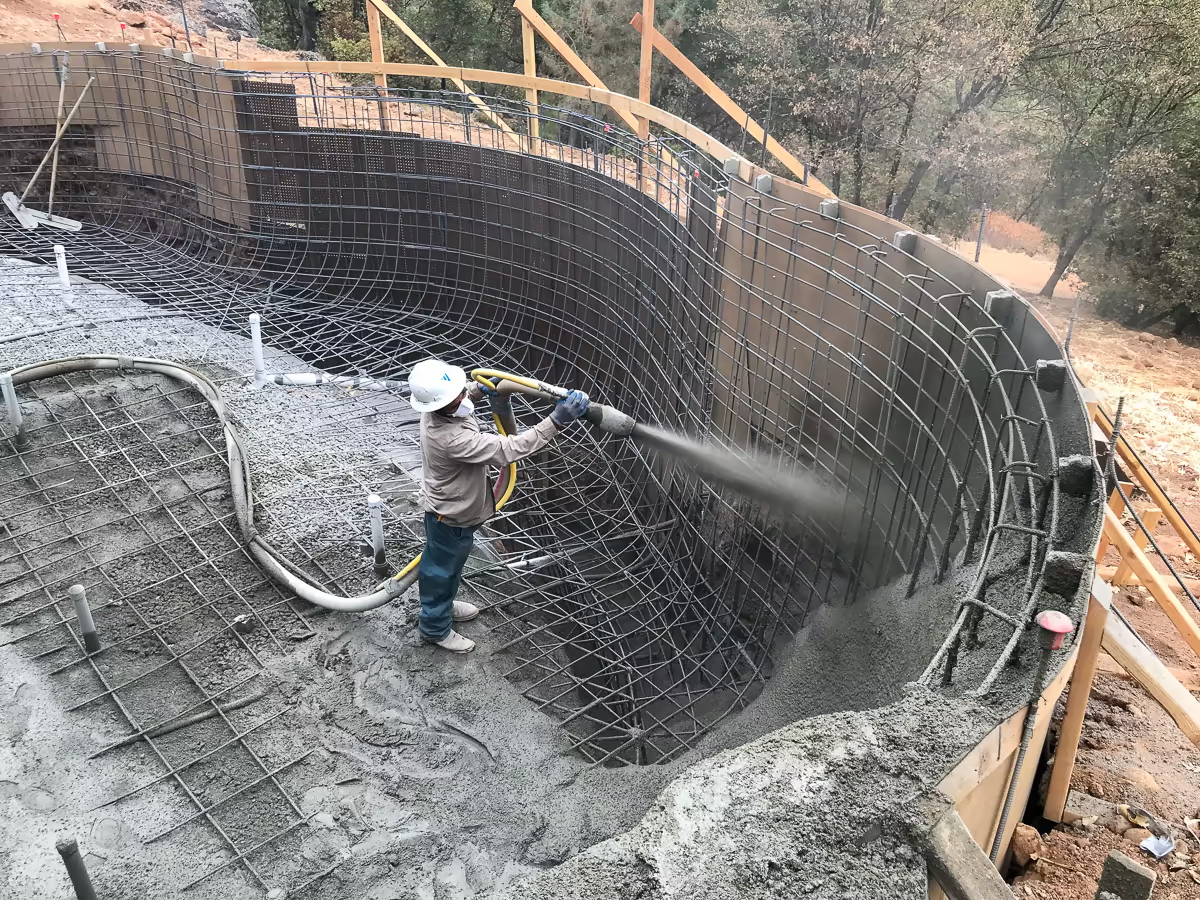
Gunite Pool Construction: Day One Preparation and Execution
This was a substantial gunite pool construction job. We planned a minimum of two full shooting days — approximately 40 cubic yards per day. To put that in perspective, that’s the equivalent of building an entire large pool, every single day.
Before the first gunite hit the shell, I walked the site and personally verified plumbing pressure test integrity. I then confirmed bond beam elevations between the main pool and catch basin with the crew chief, reviewed the structural transitions specific to the vanishing edge, and checked key dimensional tolerances against the structural plans. On a Colfax hillside project like this, every elevation and edge condition matters. There is no room for approximation.
Meanwhile, the crew prepared the shell. Workers descended into the pool to confirm all fixtures were level and plumb, the steel was properly secured, and the rebar was correctly blocked for concrete coverage. Next, they set the tripod scaffold supporting the 2-inch high-pressure hose. Then they positioned the gunite machine and spotted the mixer trucks alongside the compressor rig. Finally, with every element confirmed, we were ready to shoot.
I remained on site throughout the day. On a job this complex, questions come up and adjustments happen. My presence ensures the finished structure reflects the engineered intent.
Day One: The Water Challenge
Early in the shoot I saw the nozzleman give the cut signal. On a live gunite shoot, the crew communicates through hand signals — more air, less air, cut. I read it immediately and knew something was wrong.
Then came a loud whoosh, a cloud of dust, and silence. No water.
Without continuous water at the nozzle, gunite pool construction stops completely. There is no workaround. My client had chosen to use his private well during construction — city water in Colfax runs expensive, and that’s a reasonable call. However, I had advised him early on that wells can be overtaxed by the sustained demand of a full gunite shoot. We need a minimum of 40 gallons per minute at adequate pressure. I had recommended a water truck on standby. The well, unfortunately, had given out.
How We Solved It Without Losing a Day
Fortunately, we had an option. Long before gunite day, my client had walked me down to the well holding tank and shown me the auxiliary valve — the manual switch that transfers supply from the well to the city water line. I had noted its location. Now I needed it.
I told the crew to take five and drove down the fire road to the holding tank. I switched the valves. Within moments, the tank began filling. Then, from 300 feet up the hill, the compressor fired back up — and with it, that unmistakable sound of a gunite rig running at full capacity.
Problem solved. Shoot resumed. Nobody lost a day.
Planning a hillside pool in Colfax, Auburn, or the Sierra foothills?
Schedule a complimentary site consultation or call (916) 624-5296.
As a result of that early preparation, by 4:00 PM, the main pool shell was three-quarters complete. The work looked clean and consistent — exactly what you want to see closing out a long first day. The vanishing edge dam wall and catch pool remained. We saved them deliberately, because that work calls for a fresh crew.
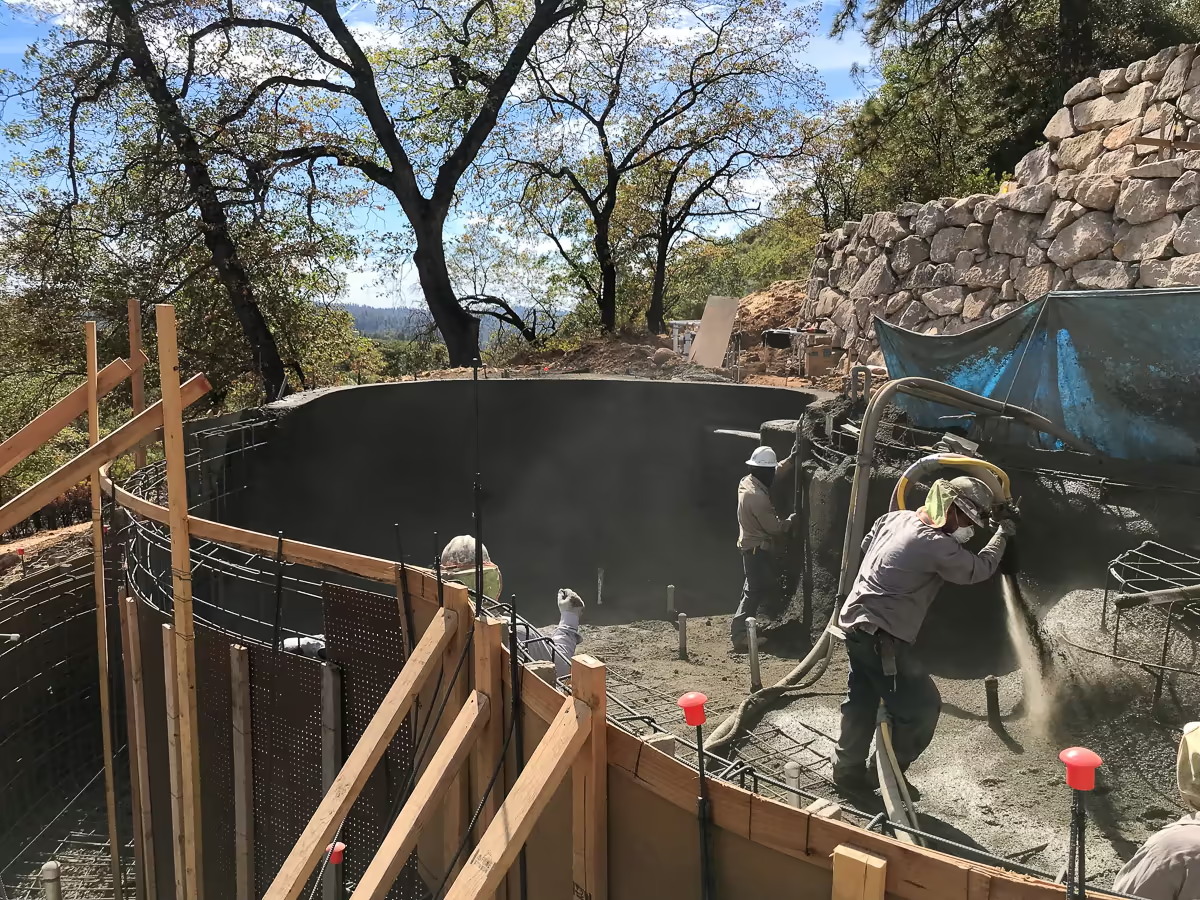
Day Two: Completing the Gunite Shell
The crew was fully set up from Day One, so Day Two started early and moved quickly. They went straight to the vanishing edge dam wall. Working from the pool side against a pegboard form, they shot the wall, stripped the form, finished the surface, and carved the sweeping radius that defines the catch pool face. That curved geometry reads as effortless in a finished pool. In fact, getting there requires real craft and disciplined execution.
The Catch Pool: A Structural Decision
On this Colfax hillside, I had designed the catch pool to be approximately 5 feet deep — unusually deep for a catch pool, but structurally correct for the site. On a slope like this, a deep catch pool functions as a footing, anchoring the structure into the hillside. With the 4-foot raised weir wall measured from the catch pool floor, the total wall height reached roughly 9 feet. Furthermore, standing at the bottom of that basin and looking up at the curved weir wall against the two 10-foot rock retaining walls made the full scale of the structure very clear. We created a place to swim where there had been nothing but a steep slope.
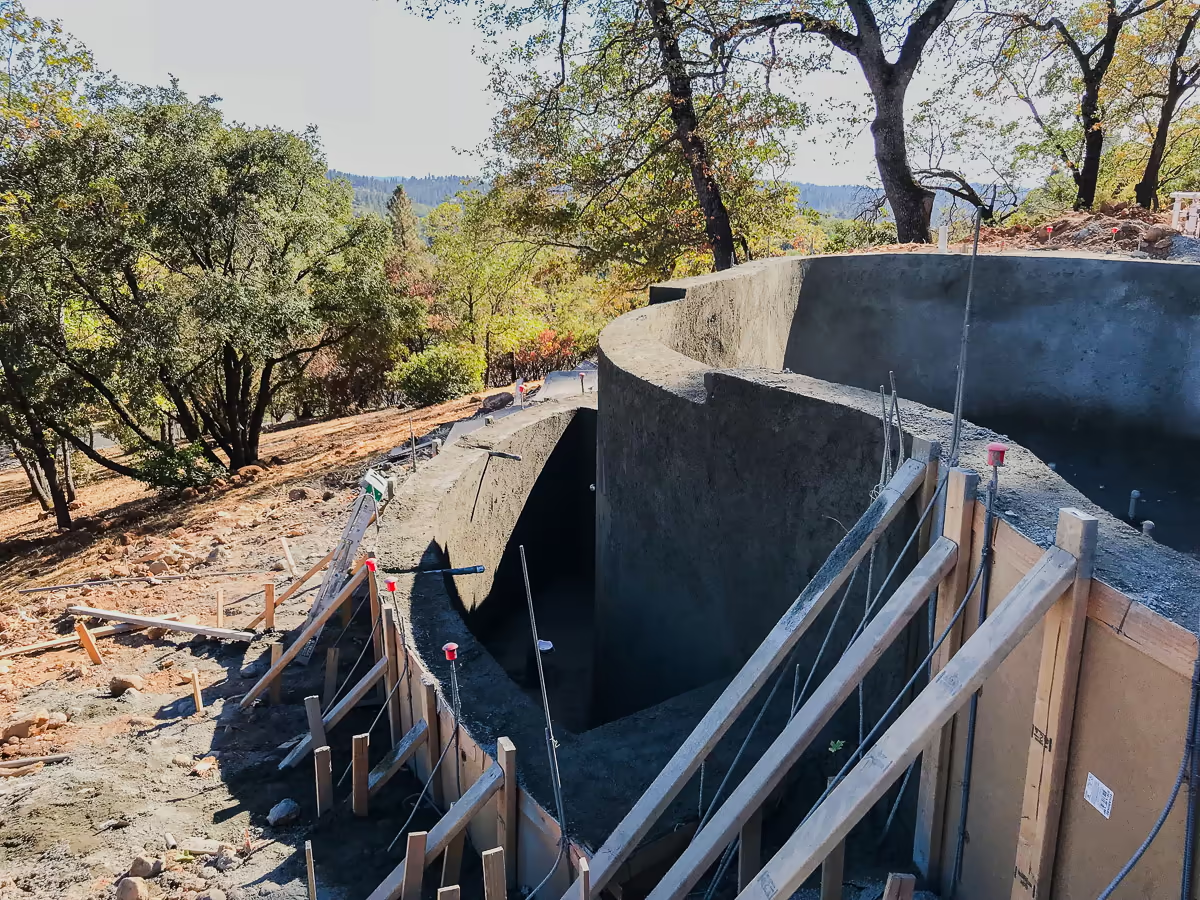
Safety Steps: A Field Call During Gunite Pool Construction
Given the catch pool depth, I made a field call to add steps. The reasoning was direct — safety first, and then access for every crew that follows: tile setters, plumbers, plaster crews. Additionally, a 5-foot basin without safe access is an unnecessary hazard throughout the remainder of construction. We worked out the layout on site and the crew shot them in precisely. It came together cleanly.
The crew stayed until the catch pool was finished. They were invested in the quality of the result — not just completing tasks but taking ownership of the work. That kind of ownership shows, and it showed here.
Curing the Shell: The Final Step in Gunite Pool Construction
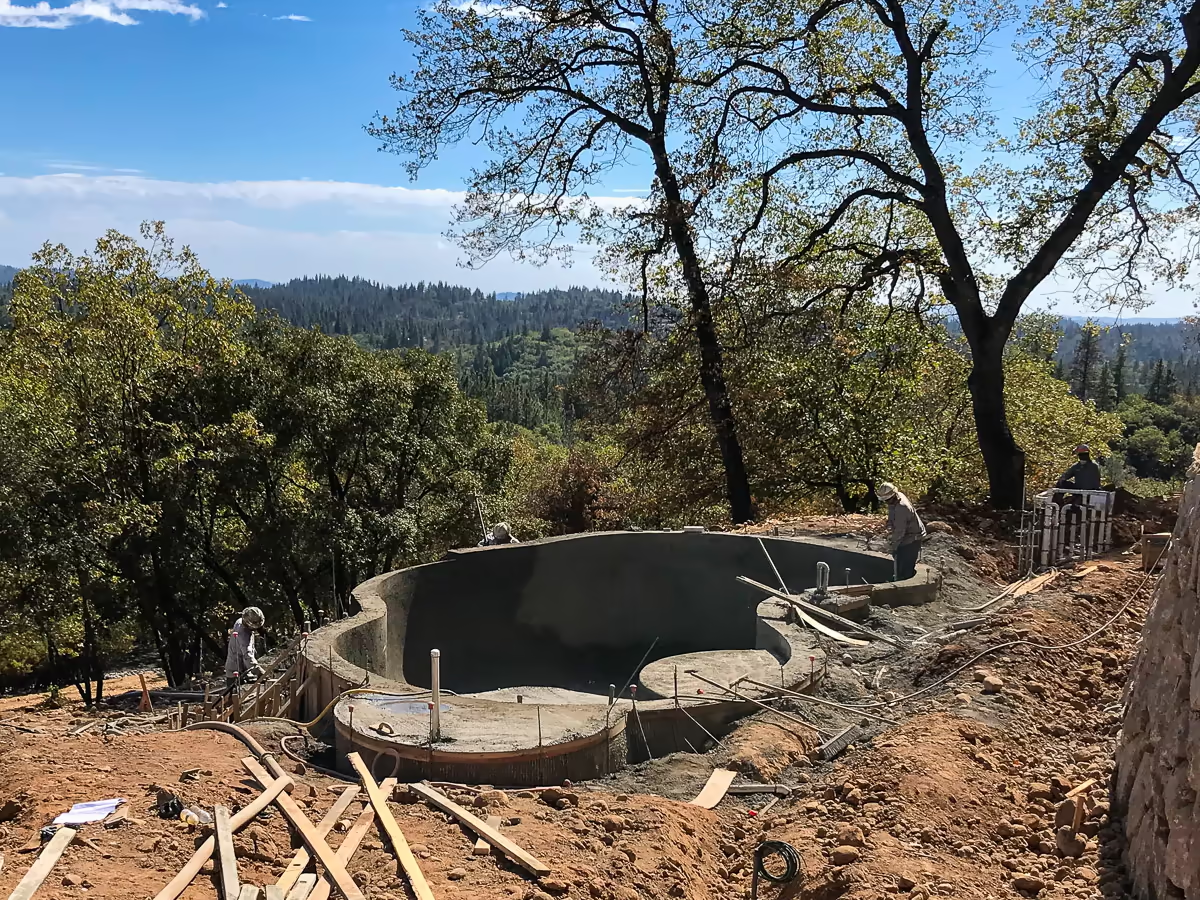
When the last pass was complete, the gunite shell finally looked like a pool. Set into that Colfax hillside, framed by the rock retaining walls and open sky, the structure matched the engineered plan exactly.
However, proper gunite pool construction does not end when the nozzle shuts off. The shell must stay continuously damp for 10 to 14 days. Curing allows the concrete to build strength gradually — drying too quickly causes micro-cracking and compromises structural integrity. For this phase, we depend on the homeowner. In this case, my client arranged for his neighbor to water the shell daily throughout the curing period. I met the neighbor on site, walked him through the process, and thanked him for taking it seriously. He did. That kind of follow-through on a remote Colfax hillside project is something you remember.
Gunite days are demanding. They are loud, technical, and unforgiving — and because of that, they leave no room for improvisation on the details that matter. But they are also the moment when a design stops being a plan and becomes a permanent structure.
Steel and excavation define the form. Gunite defines the structure.
The pool had arrived.
Colfax Vanishing Edge Pool Series
Post 1: Vanishing Edge Pool Colfax — Building on a Steep Hillside
Post 2: Vanishing Edge Pool Construction — Colfax Project Takes Shape
Post 3: Gunite Pool Construction — The Shell Takes Shape
Post 4: Tile, Waterfall and Deck — Colfax Vanishing Edge Pool
Read Stage 4: Tile & Waterfall Finishes →
About Jim Chandler Pools
Jim Chandler Pools has built custom gunite swimming pools for more than 35 years throughout the Greater Sacramento region and Sierra foothills. The firm specializes in hillside construction and engineered vanishing edge pools.
As a second-generation pool builder, I bring deep technical knowledge to every project. I previously served as a paid Swimming Pool (C-53) Subject Matter Expert panelist for the California Contractors State License Board (2012–2017). That experience strengthened my understanding of engineering standards and regulatory compliance.
I focus on challenging sites where others hesitate. Hillside construction is my specialty. Complex structural conditions are my expertise. Projects requiring more than standard construction are where I do my best work.
Serving Sacramento, Rocklin, Granite Bay, Auburn, Grass Valley, Folsom, and El Dorado Hills.
California Contractor License #585004
Schedule a complimentary consultation | (916) 624-5296